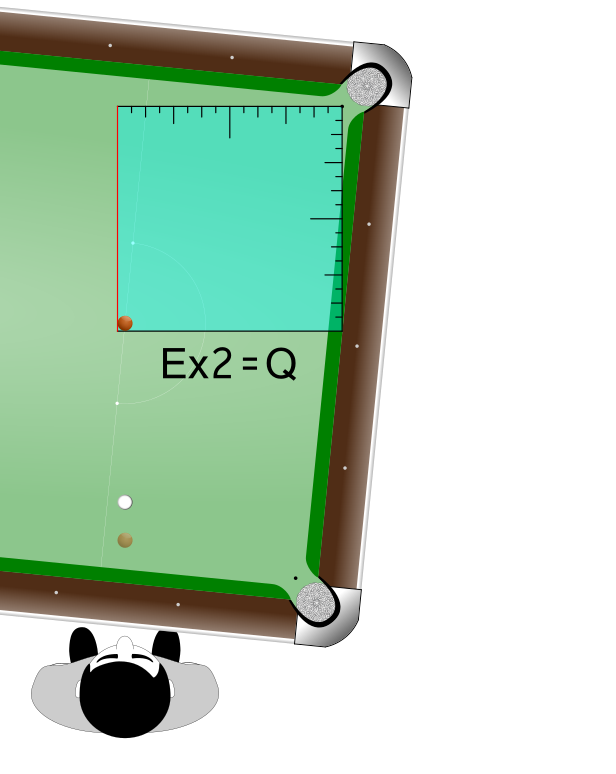
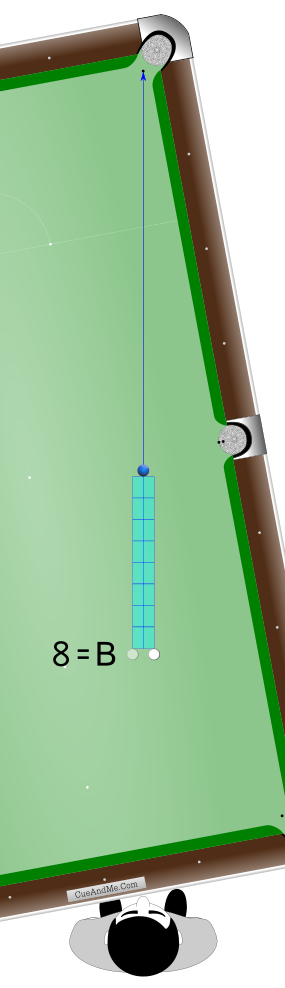
Object Ball Repositioning
From Position 1, imagine pulling the object ball halfway closer to the near/bottom corner.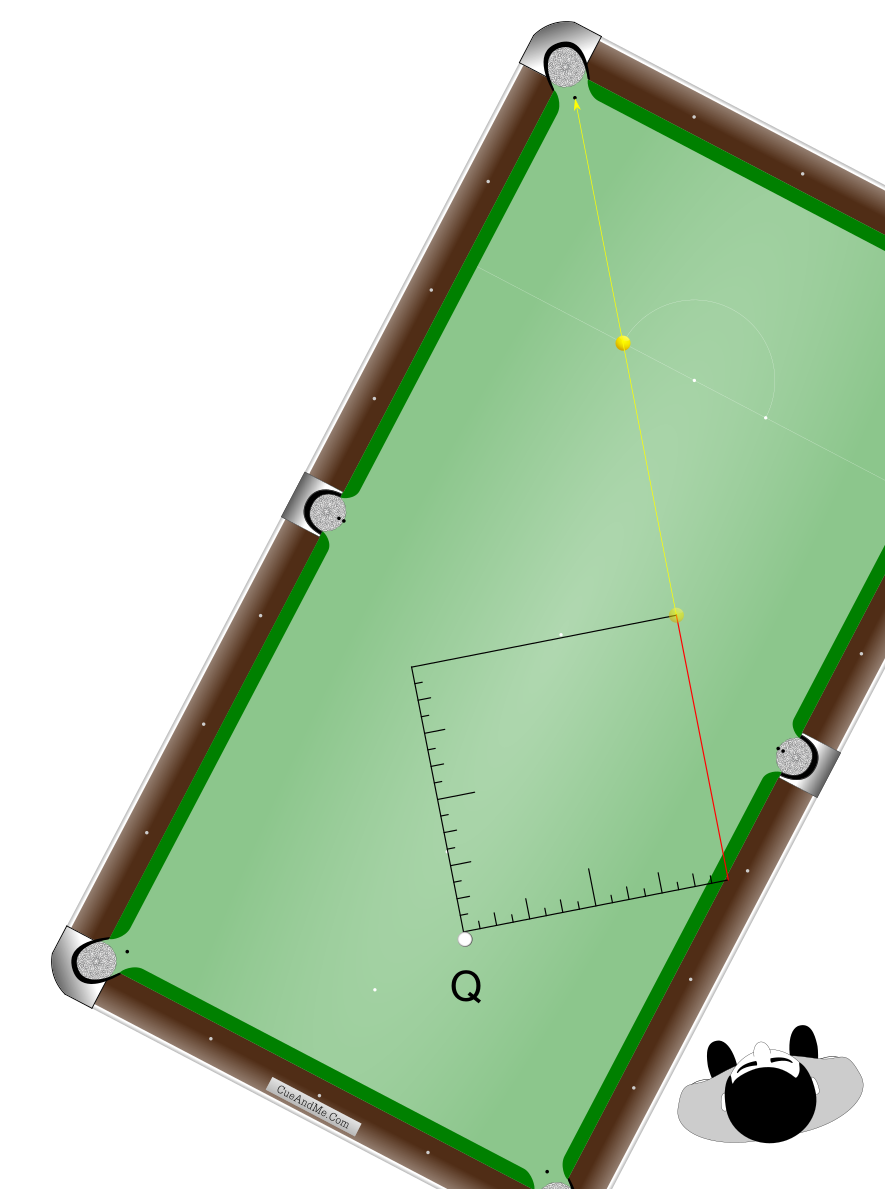
Determine the shot label for this new half-height rectangle, and then halve the shot label.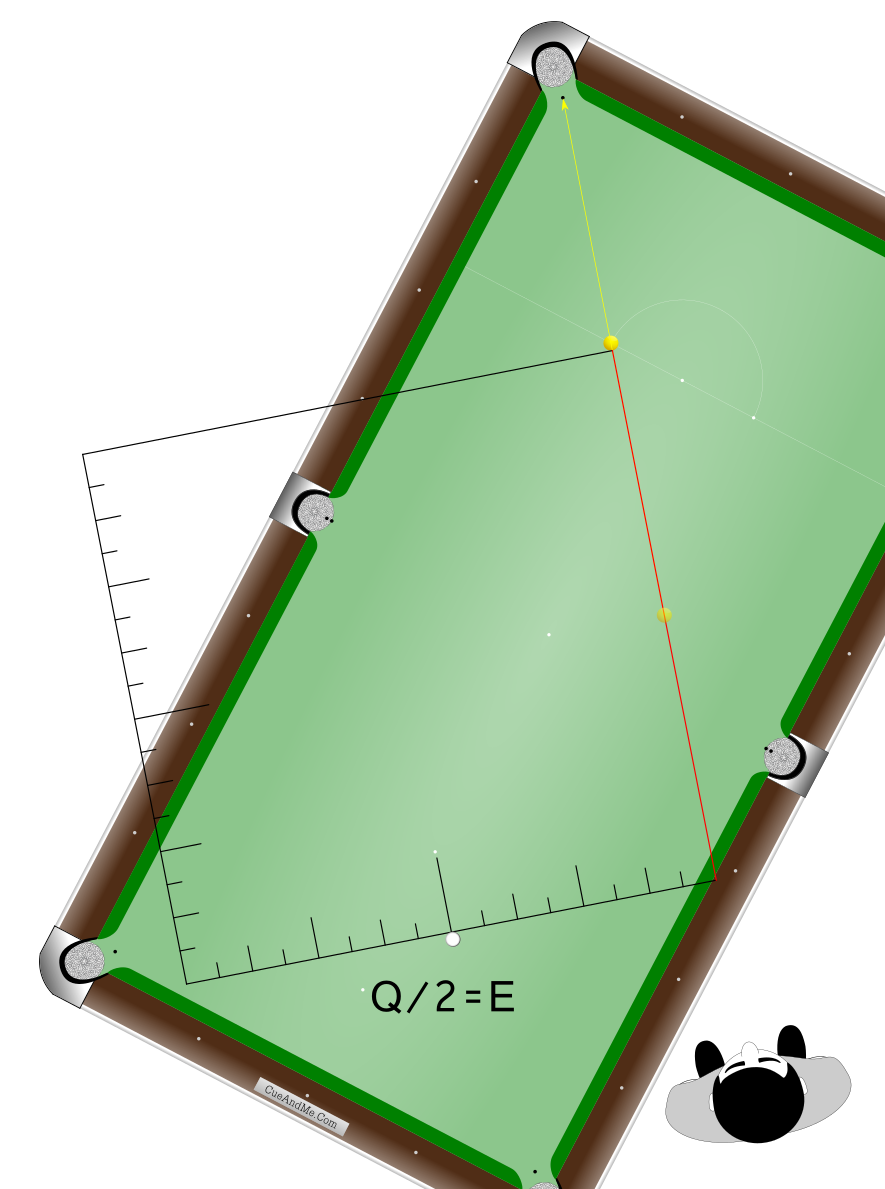
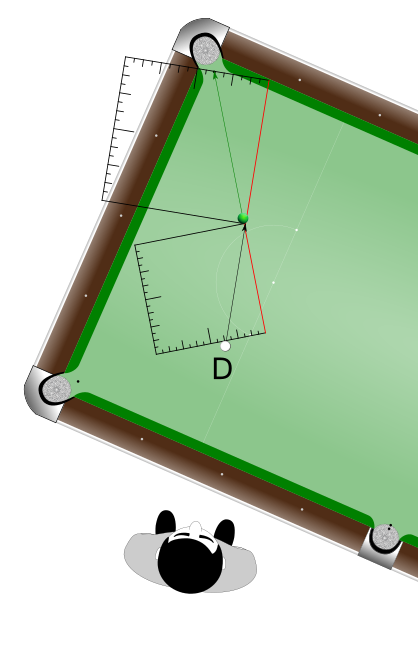
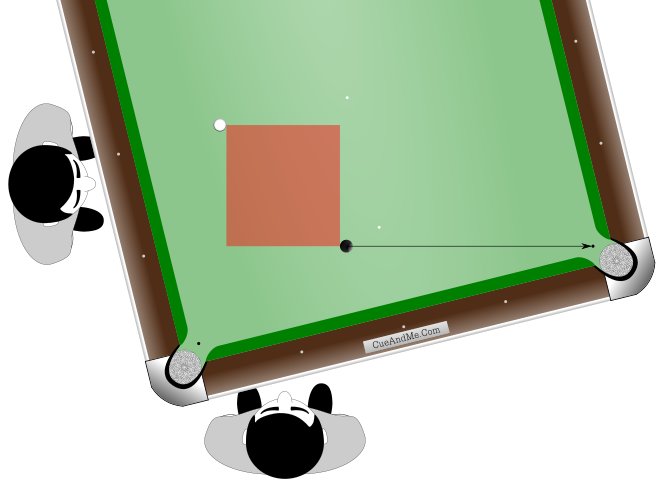
Or from Position 2 with its upside-down Master Square, imagine pushing the object ball away from you so that it is halfway closer to the near/bottom corner, and then halve the shot label.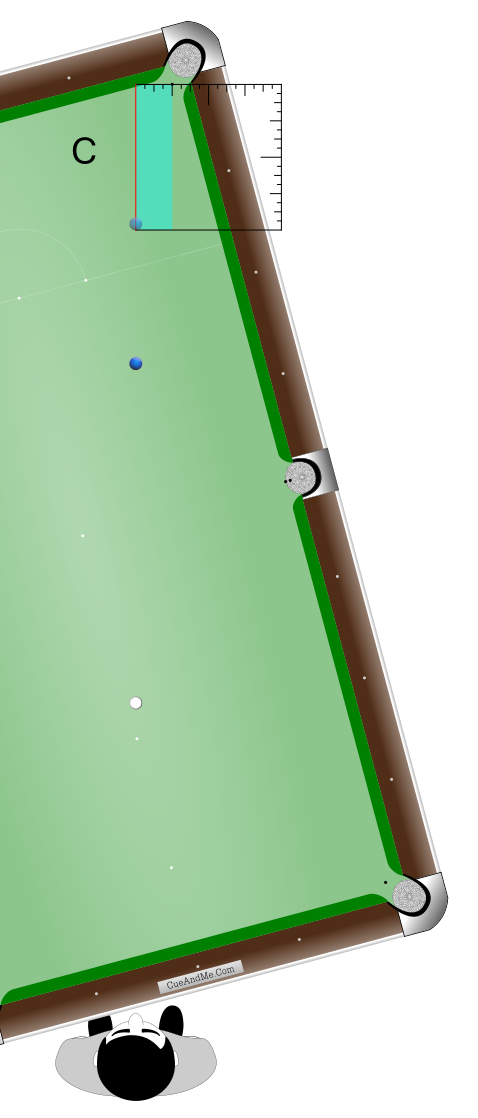
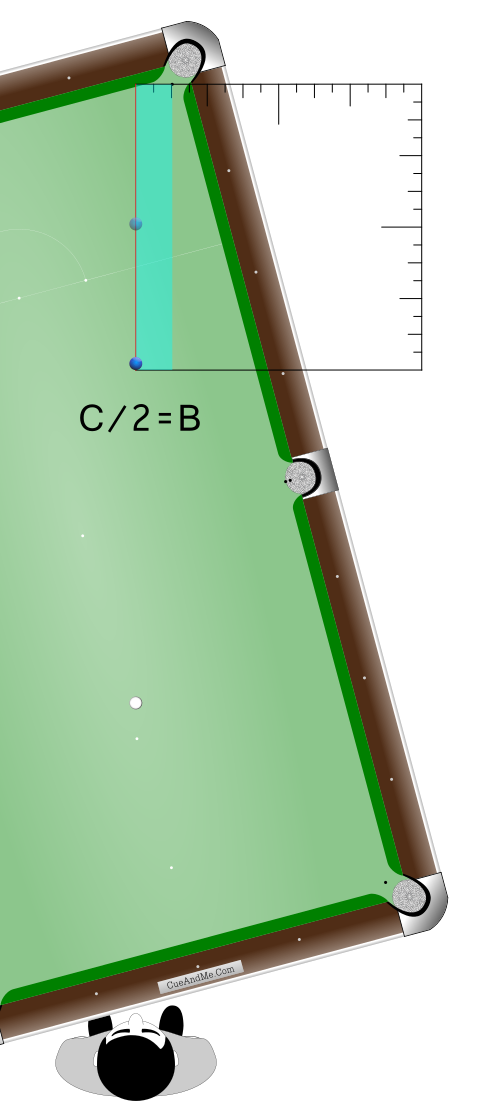
From Position 2, you could alternatively pull the pocket center halfway closer to the far/top corner.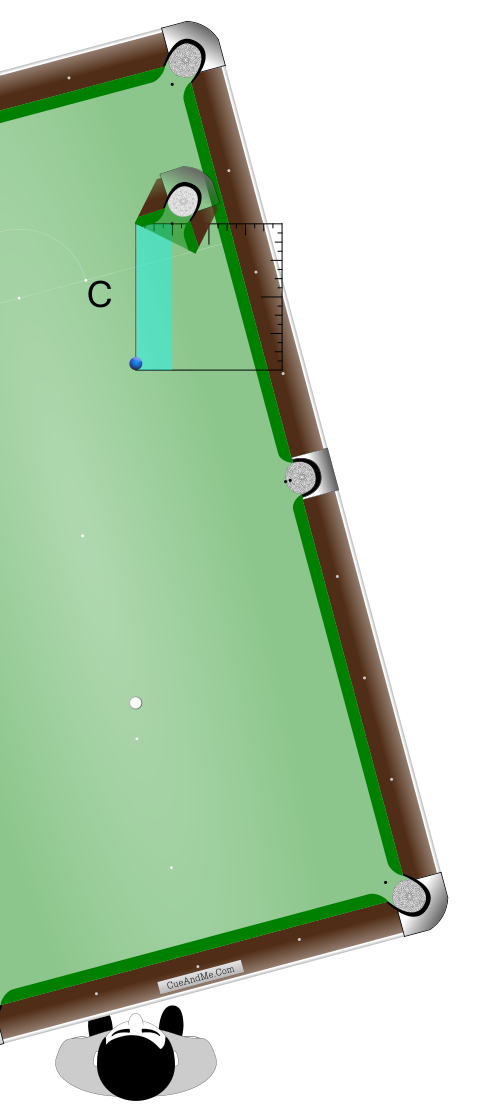
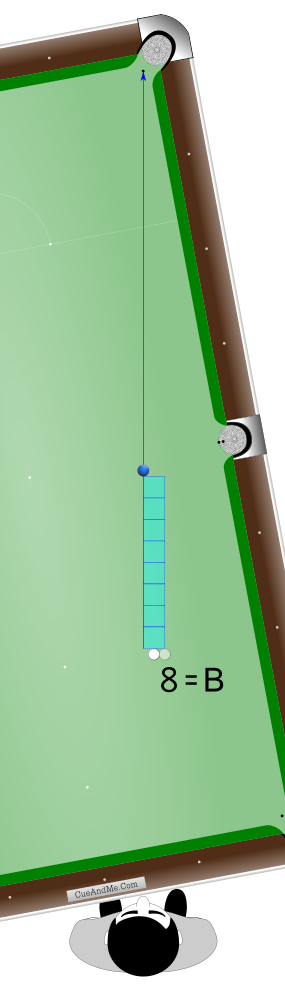
Cue Ball Repositioning
From Position 1, imagine pushing the cue ball twice as far from the bottom side.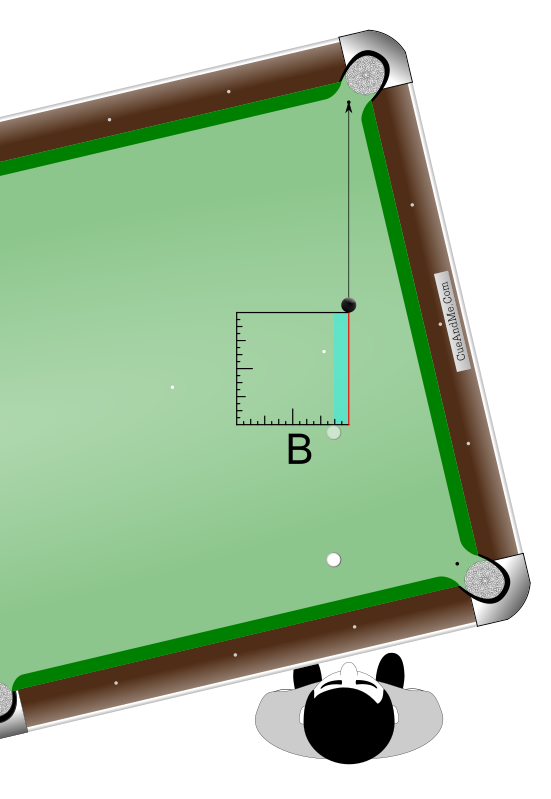 Determine the shot label for this new half-length rectangle, and then halve the shot label.
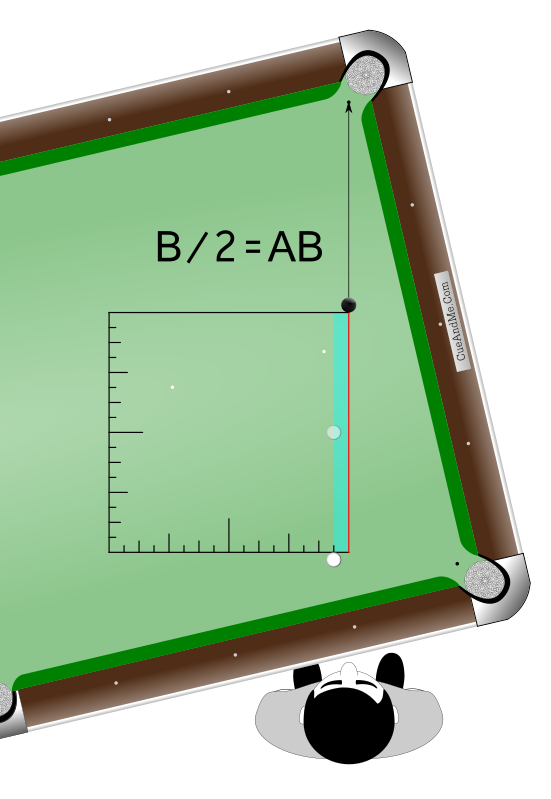
Another way to accomplish the same thing is to push the cue ball twice as far from the near/bottom corner but sideways. Determine the shot label for this new double-width rectangle, and then halve the shot label.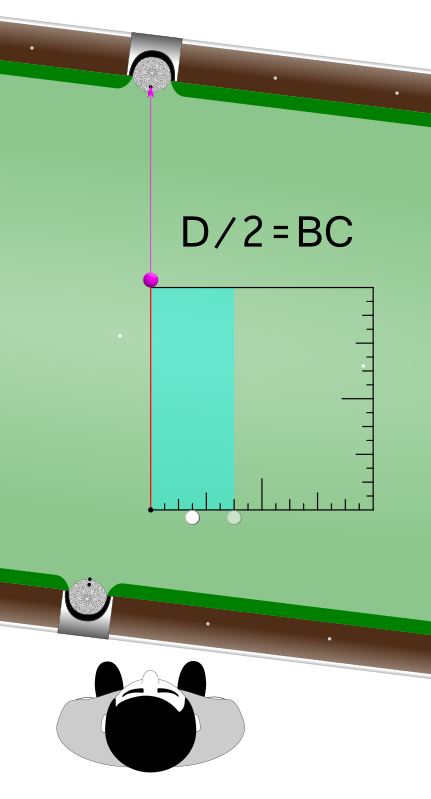
We can also determine a shot label by first finding the label of a rectangle that is either double our rectangle’s height or half its width, and then doubling that shot label. This can be very helpful when the actual shot rectangle is wide or when there is little distance between the cue ball and object ball. It is also another wonderful way to double-check your work. The Half/Double chart above still applies.
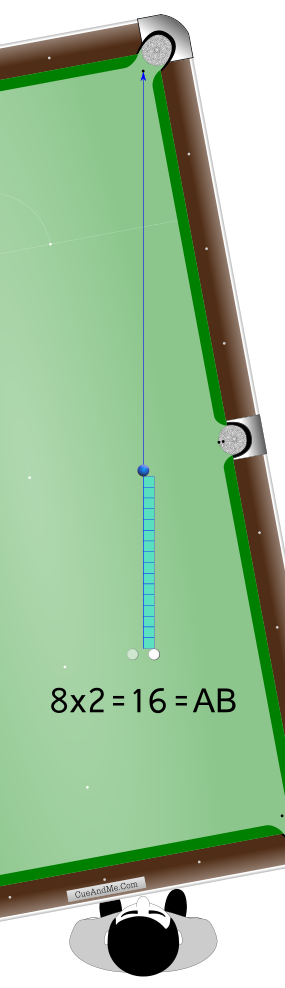
Object Ball Repositioning
From Position 1, imagine pushing the object ball twice its current distance from the near/bottom corner.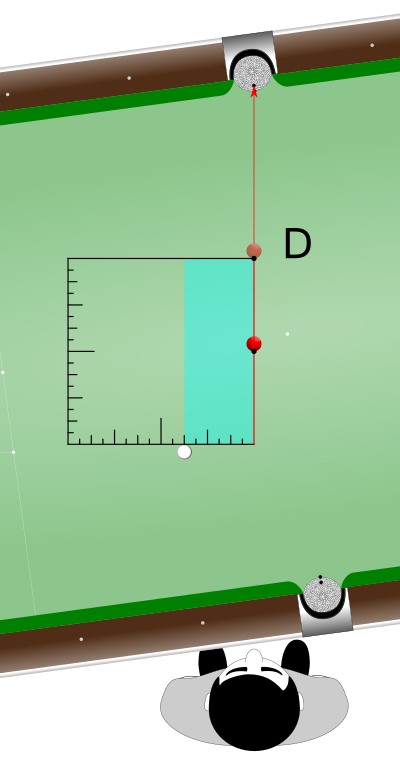 Determine the shot label for this new double-height rectangle, and then double the shot label.
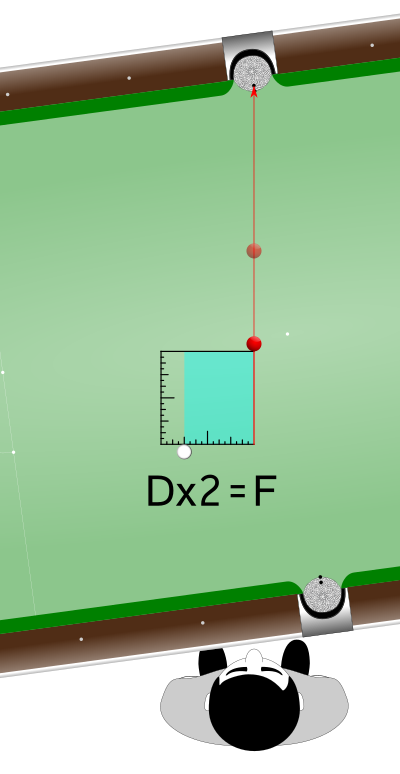 Or from Position 2 with its upside-down Master Square, imagine pulling the object ball toward you to twice its current distance from the near/bottom corner, and then double the shot label.
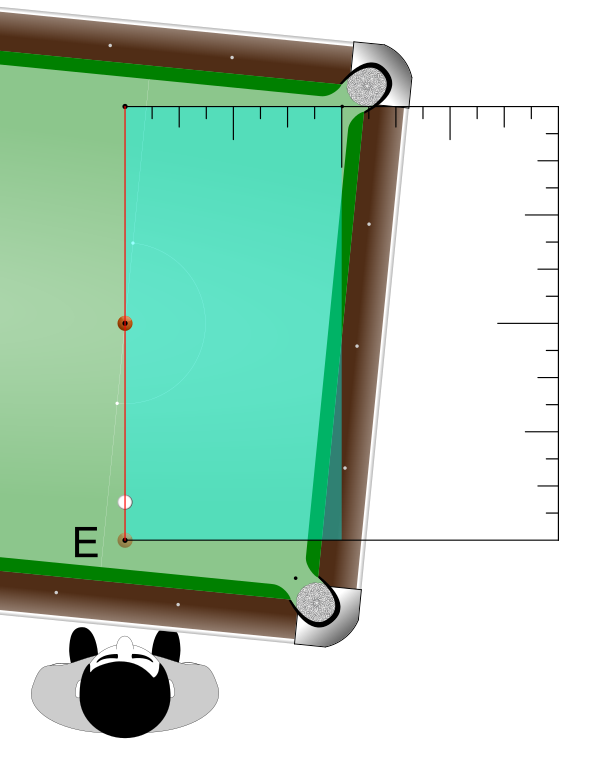
 From Position 2, you could alternatively push the pocket center twice as far from the far/top corner.
Cue Ball Repositioning
From Position 1, imagine pulling the cue ball twice its current distance from the top side.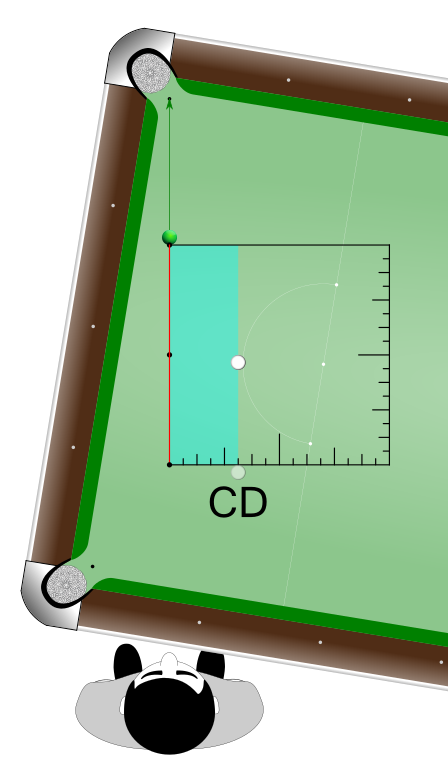 Determine the shot label for this new half-width rectangle, and then double the shot label.
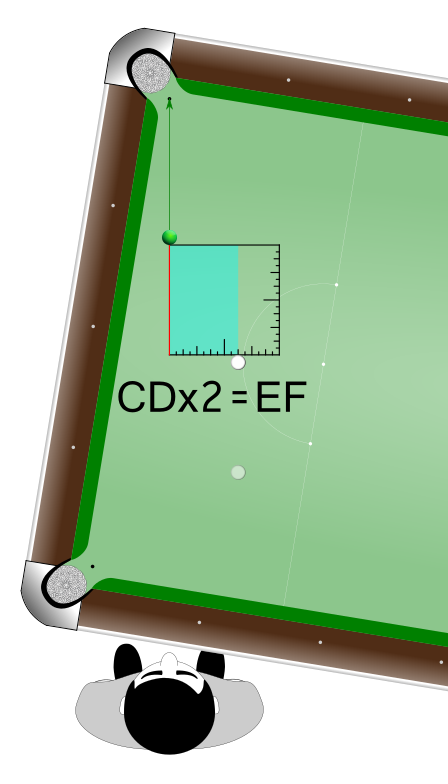
Another way to accomplish the same thing is to pull the cue ball half as far from the near/bottom corner but sideways. Determine the shot label for this new half-width rectangle, and then halve the shot label.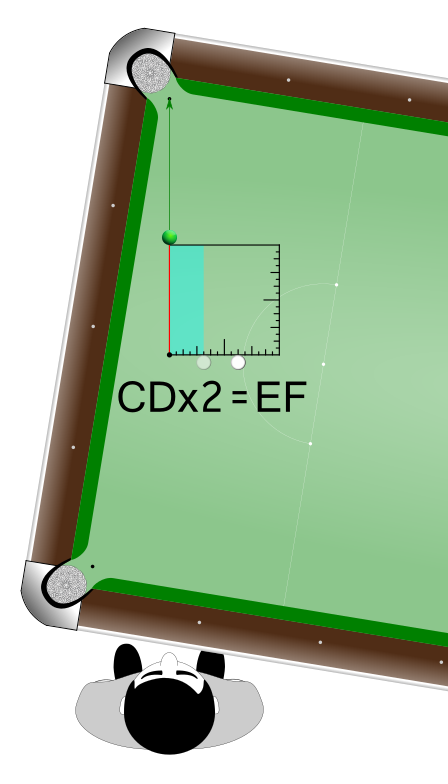
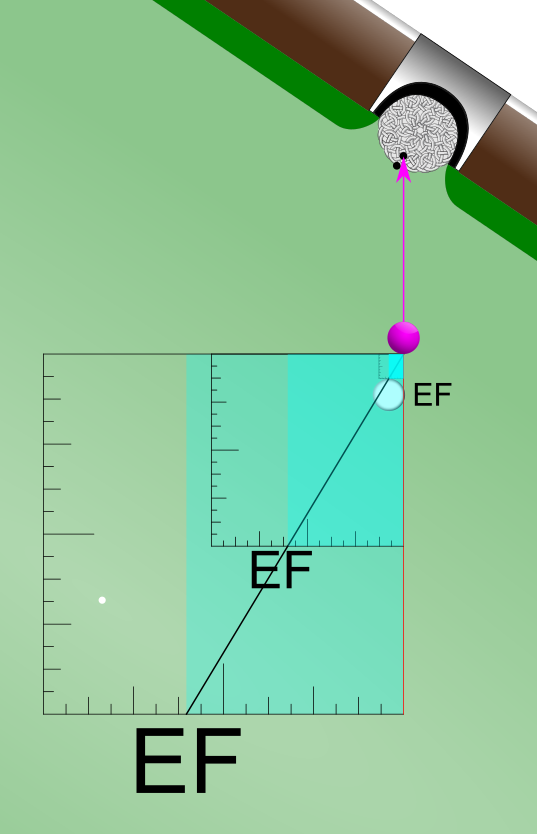
The shot rectangles and patterns have been sized according to the Master Square’s dimensions, but a straight line drawn from the cue ball to the object ball opens up other options.
From Position 1, if we were to imagine relocating the cue ball anywhere along this cue ball to object ball “zip line”, we could use the new location to arrive at the very same shot rectangle or label. The repositioned cue ball effectively shrinks the Master Square and all of the rectangles within, but it retains the current shot setup’s unique proportions.
To be perfectly accurate, the zip line would have to be drawn between the contact points rather than the ball centers. However, the most likely condition for this technique’s application is when the balls are far apart from one another and therefore far enough that the exact location does not matter much. A good compromise would be to draw the line from the cue ball’s center to somewhere near the object ball’s contact point. Any point on the cloth that lies beneath the zip line can be used as a substitute cue ball location.
Using the boundaries of the new shrunken Master Square, simply apply any Angle Detective method to find the shot label.
It is also possible to enlarge the Master Square by extending the zip line to beyond the cue ball. This may be helpful for shots where the cue ball and object ball are close to one another. Viewing the larger Master Square or rectangle opens up more room to apply your chosen Angle Detective method. In this case, the zip line’s end points should be as close as possible to the contact points on the cue ball and object ball. Alternatively, the shot label should be adjusted to a thinner one before shooting.
From Position 2, the zip line would be drawn from object ball to pocket. Simply relocate the object ball anywhere along the line and apply your chosen Angle Detective method to the shrunken Master Square.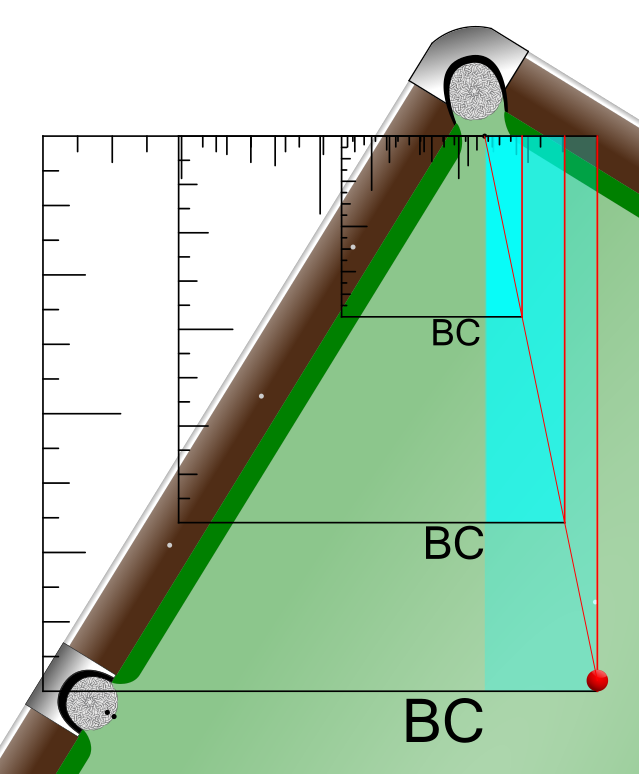
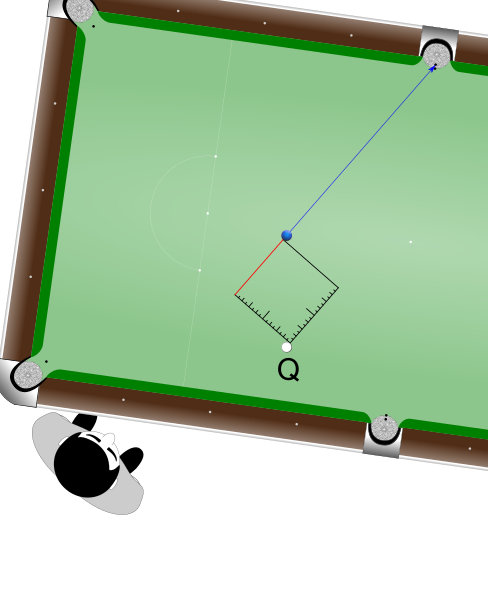
A quick way to check if a shot rectangle is just under ‘Q’, just over ‘Q’, or exactly ‘Q’ is to first stand near Position 1 and feel the rectangle’s width.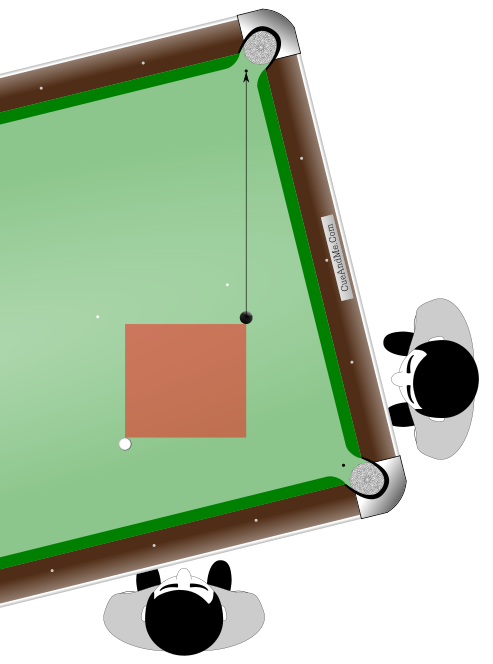
Then reposition yourself 90° to the side of the shot near Position 3 and feel the width of this new rectangle.
Compare the two rectangle widths. If the Position 1 width feels wider than the Position 3 width, then the shot label is over ‘Q’. If the Position 1 width feels narrower than the Position 3 width, then the shot label is under ‘Q’. If they feel the same, the shot label is exactly ‘Q’.
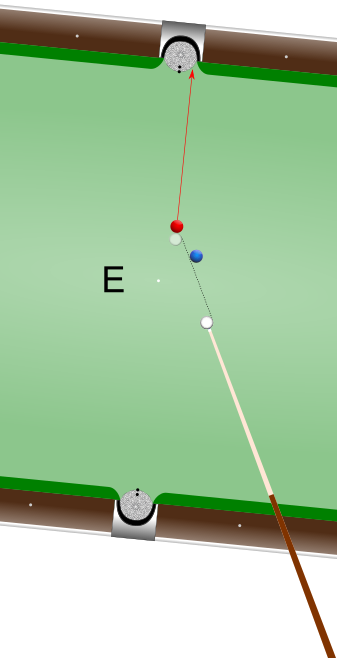
Sometimes a player needs to pot an object ball to one side of the pocket’s perfect center to either avoid an obstacle or to alter the cue ball’s path to the next shot. Position 1 and Position 1-2 can precisely find the range of shot labels that will allow for the object ball to be potted. Once the player knows the range of shot labels available, he or she can choose which label within that range offers the best potential outcome for the situation.
To find this range, we alter Position 1 or Position 1-2 so that we are standing on a release line that is drawn from the object ball’s center through the most extreme portion of one side of the pocket that would still allow for the object ball to drop. From this position we apply our chosen Angle Detective method to find our first shot label.
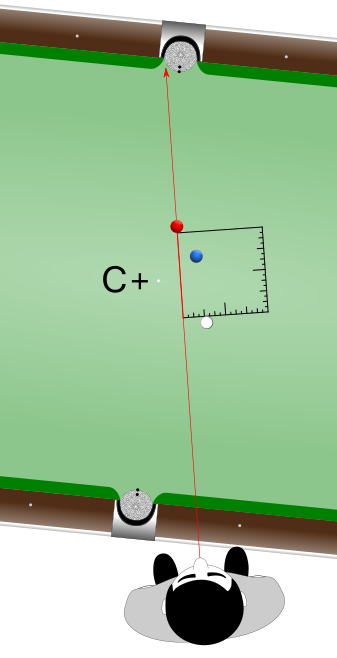
To find the other extreme we alter Position 1 or Position 1-2 again by standing on a release line that is drawn from the object ball’s center through the most extreme portion of the other side of the pocket that would still allow for the object ball to drop. From this position we apply our chosen Angle Detective method to find our second shot label.
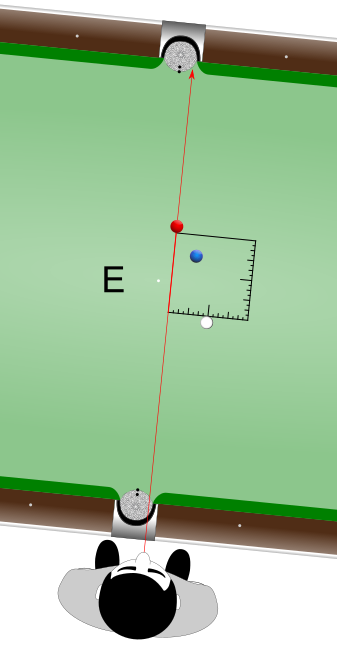
These two shot labels mark the thickest and thinnest cut shot that is available to us. The example shows the 11° range from ‘C+’ to ‘E’. We now know that the ball can be potted from either of those two labels or any label between them. What label we choose depends upon the avoidance of an obstacle or other goal for the current shot. In the example, we would probably choose to thinly cut the red ball to the right side of the pocket with an aim near the ‘E’ extreme in order for the cue ball to avoid colliding with the blue ball.
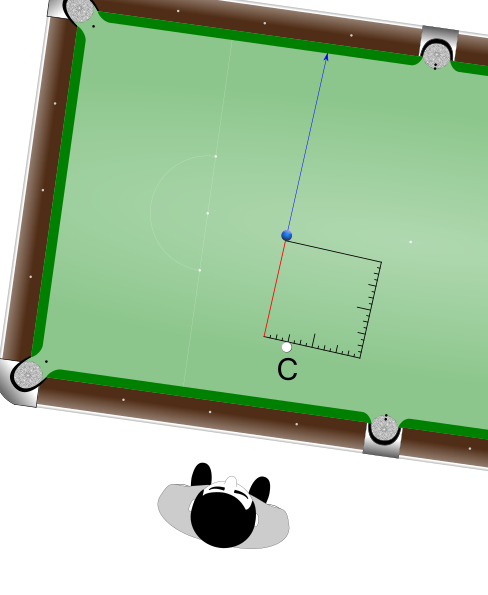
From Position 2, try stepping sideways one reference label at a time until you reach Position 1 for the current shot.
For example, ignoring the pocket for a moment, start from behind the cue ball in what would be Position 2A as if you were shooting a straight ‘A’ shot into the cushion.
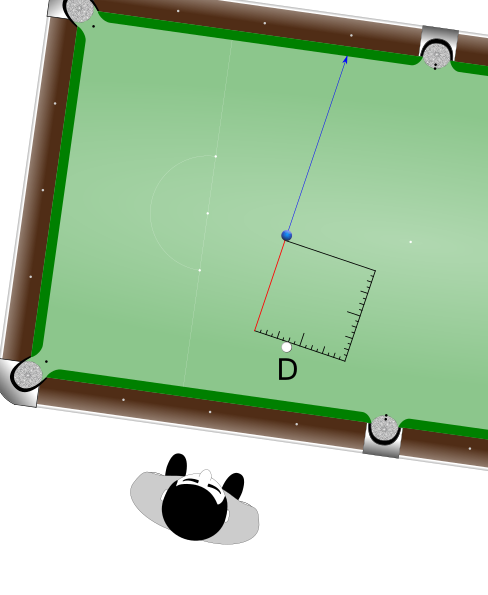
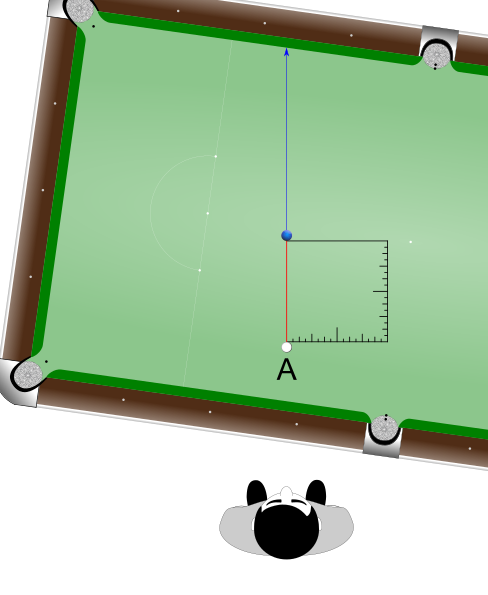 Then step sideways until the cue ball to object ball orientation appears to be a Position 1 ‘B’ shot.
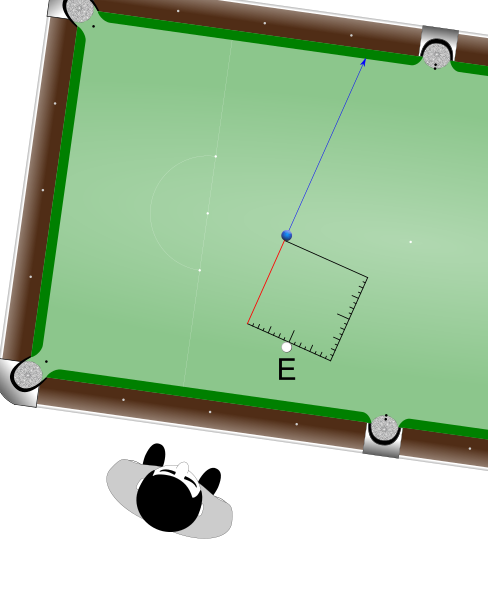
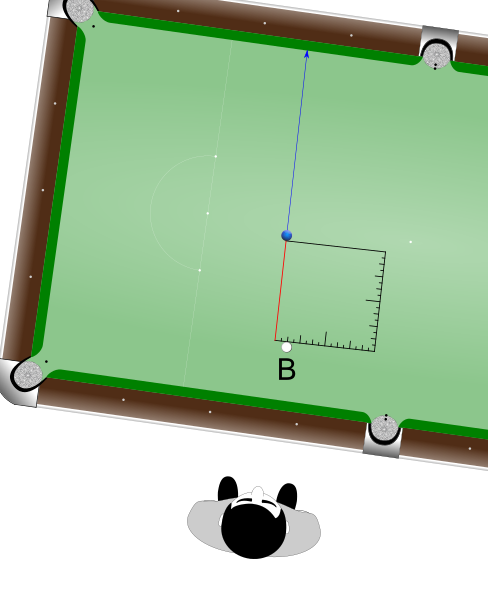 Step sideways again into what would be a ‘C’ shot.
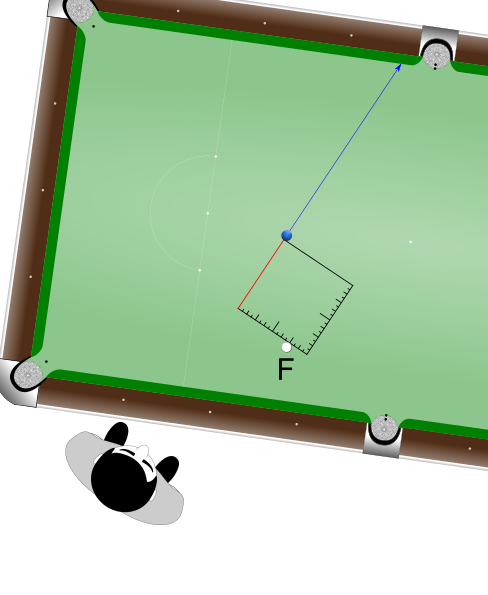
 Continue to step one reference at a time until you are standing in the true Position 1 location that is along the release line and facing the pocket.
 By doing this, you arrive at the proper shot label while also exercising your recognition of the narrower reference shots you encounter along the way. It can also help to double check the shot label you came up with from Position 2.
This can also be useful in reverse. Standing in Position 1, you are also standing in what would be Position 2A for an ‘A’ shot if the cue ball were in front of you. Step sideways to what would be a Position 2B ‘B’ shot.
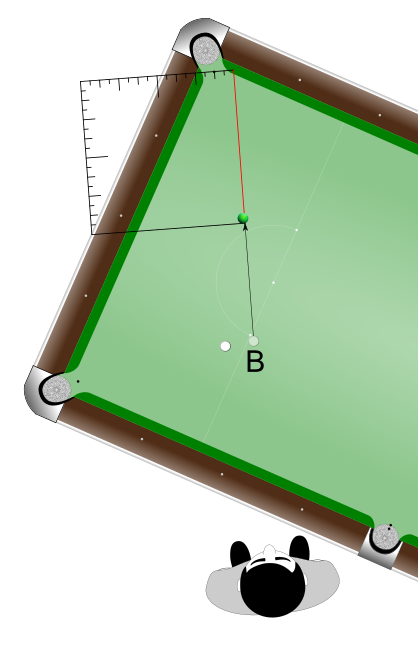 Step sideways again into what would be a Position 2C ‘C’ shot.
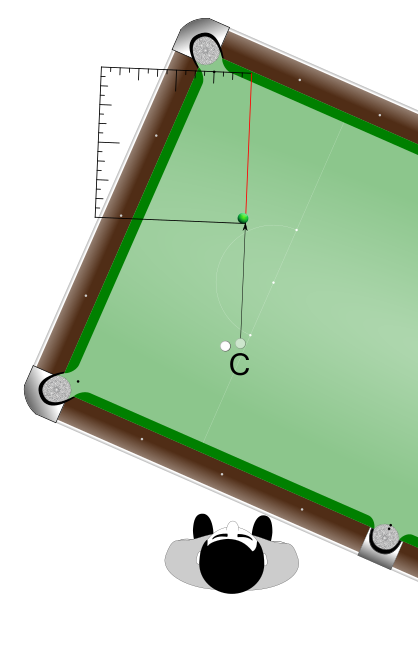 Continue to step one reference at a time until you are standing in the true Position 2 location behind the cue ball and facing the current shot label’s aim on the object ball.