
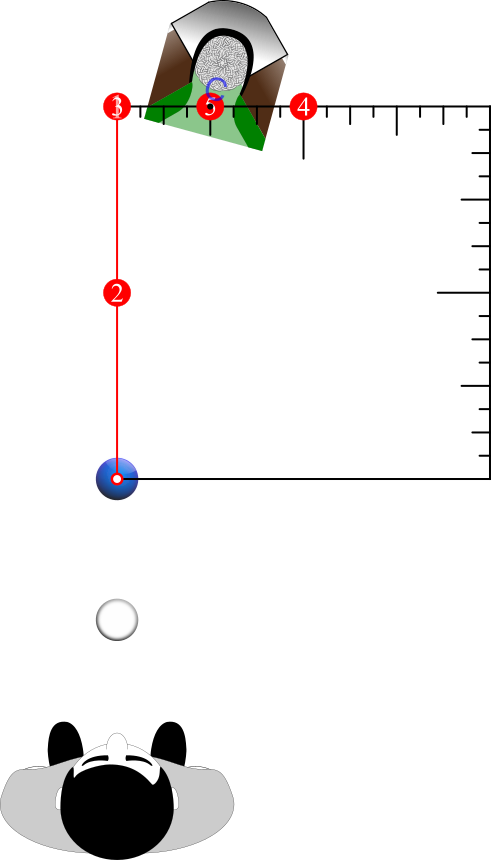
All of the Position 2 patterns reside within the Position 2 Master Square.
Position 2 Master Square
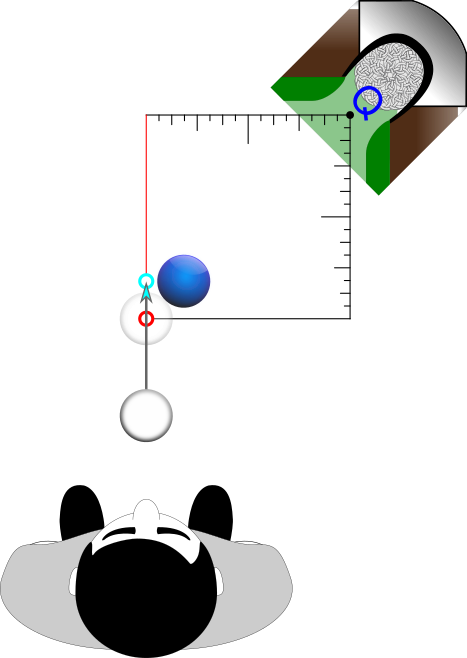
We can draw all of the Position 1 patterns from Position 2. Recall that Position 2 is the position where we stand behind the cue ball and look in the direction of the object ball. The main difference is that the Master Square is no longer constrained by the cue ball and the object ball. For Position 2 patterns, the Master Square is constrained by the object ball and the center of the pocket.
Because the distances from cue ball to object ball and from object ball to pocket are not equal for most shots, Position 1 and Position 2 Master Squares are normally different sizes for the very same shot.
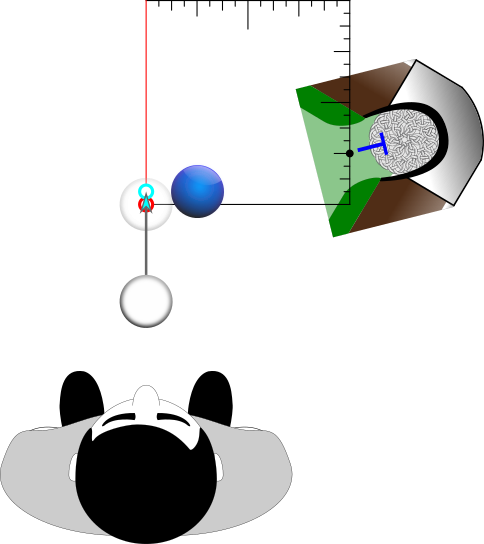
Fortunately, the Master Square’s proportions remain the same no matter what its size and so do all of our angles and patterns that are drawn from Position 2.
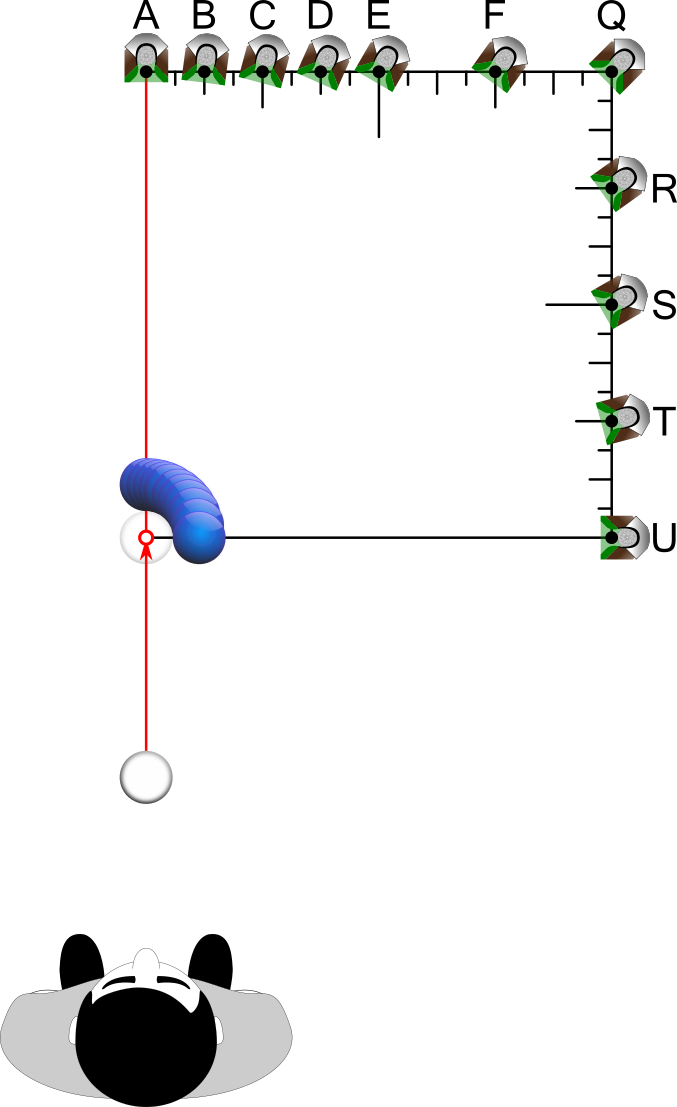
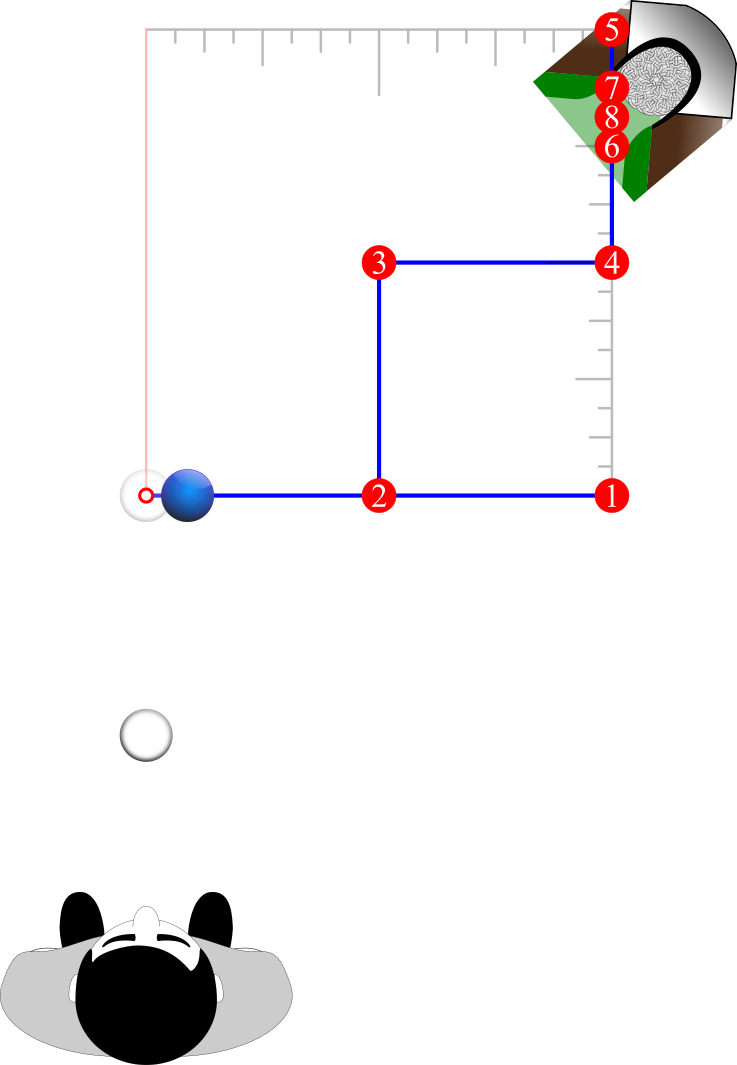
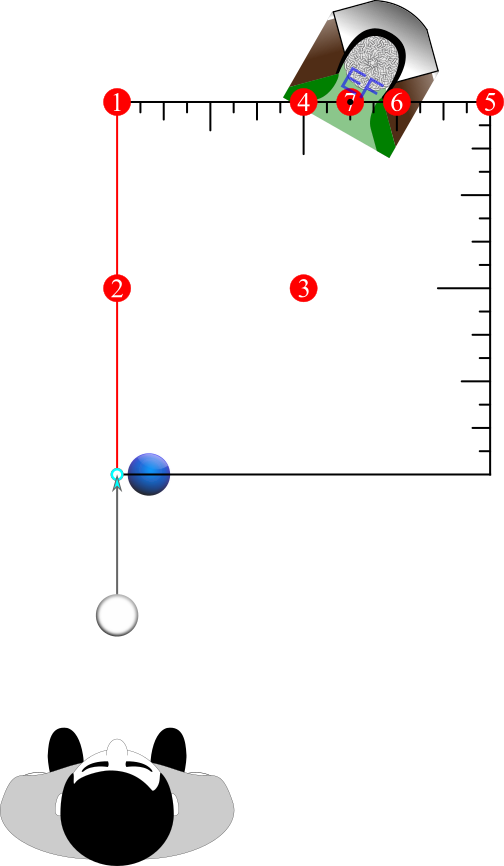
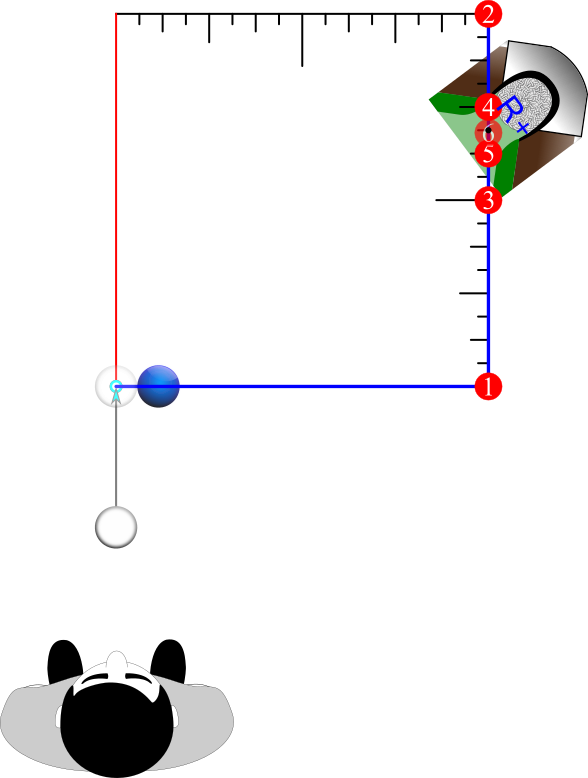
The orientation of the Position 2 Master Square is different than that of Position 1. Standing in Position 2, the Master Square is upside-down with its near side lying along an extension of the cue ball to object ball line. This new orientation flips the standard Position 1 pattern sequence lines vertically but not horizontally. So Downs are Ups and Ups are Downs, but Rights remain Rights, Lefts remain Lefts, Zigs remain Zigs, and Zags remain Zags.
Example 1| the standard Position 1 h-pattern Sequence 1 to ‘E’ is: Down, ½ Up, Right, Down. However, from Position 2 for the same cut shot to the right, the h-pattern Sequence 1 is: Up, ½ Down, Right, Up.
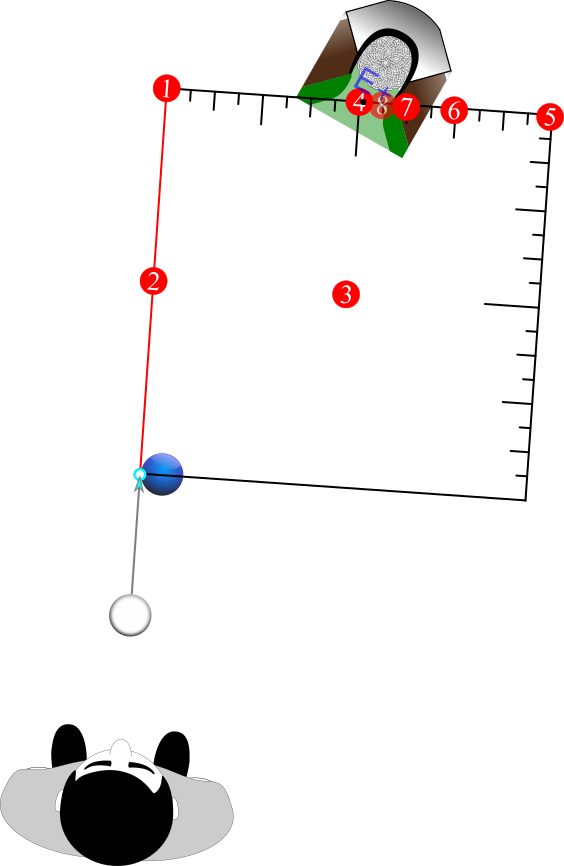
Example 2| the standard Position 1 hL-subpattern Sequence 1 to ‘CD’ is: Down, ½ Up, Down, Right, ½ Left, ½ Right, ½ Left. However, the Position 2 version would be: Up, ½ Down, Up, Right, ½ Left, ½ Right, ½ Left
Example3| the standard Position 1 Over 45° w-subpattern Sequence 1 to ‘T+’ is: Right, ½ Left, Down, Right, Down, ½ Up, ½ Down, ½ Up. However, the Position2 version would be: Right, ½ Left, Up, Right, Up, ½ Down, ½ Up, ½ Down.
Since the only difference between the Position 1 sequences and the Position 2 sequences is the vertical swapping, to save space I won’t repeat the sequences here. The line proportions of all patterns are always the same. It is only the line directions of the sequences that vary when going from standard right cuts to standard left cuts, from standard Position 1 to flipped variations, or from Position 1 to Position 2.
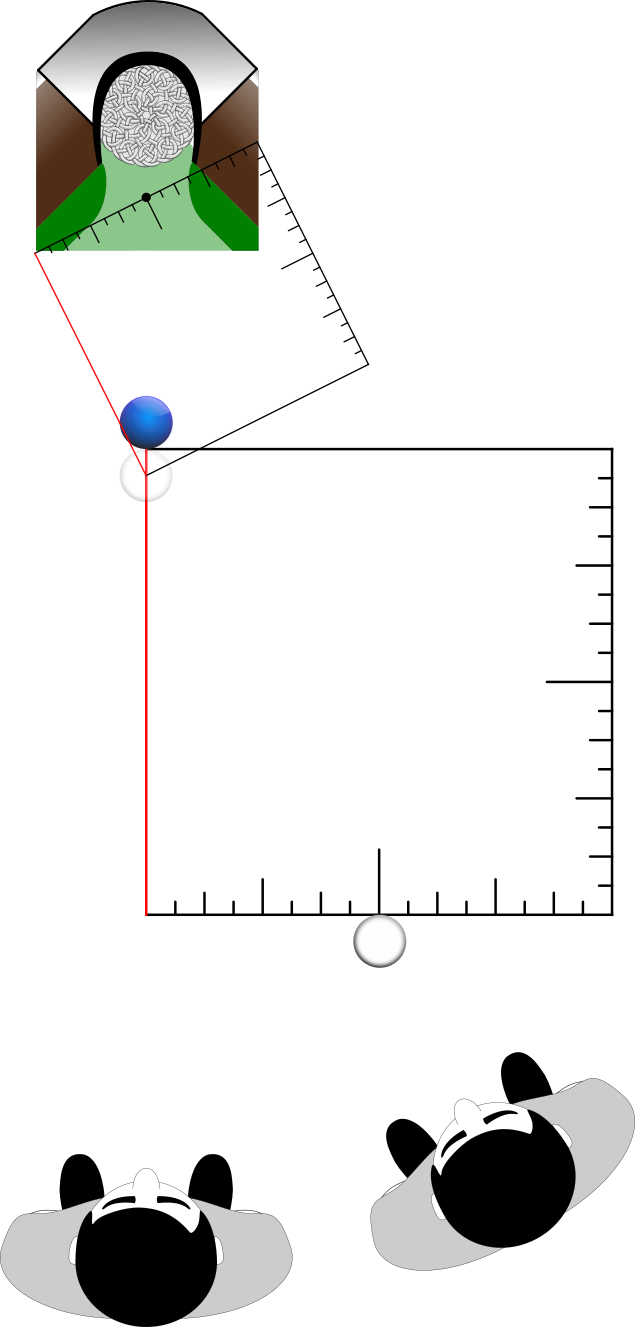
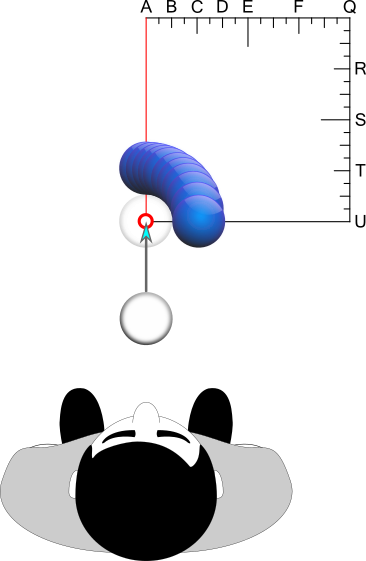
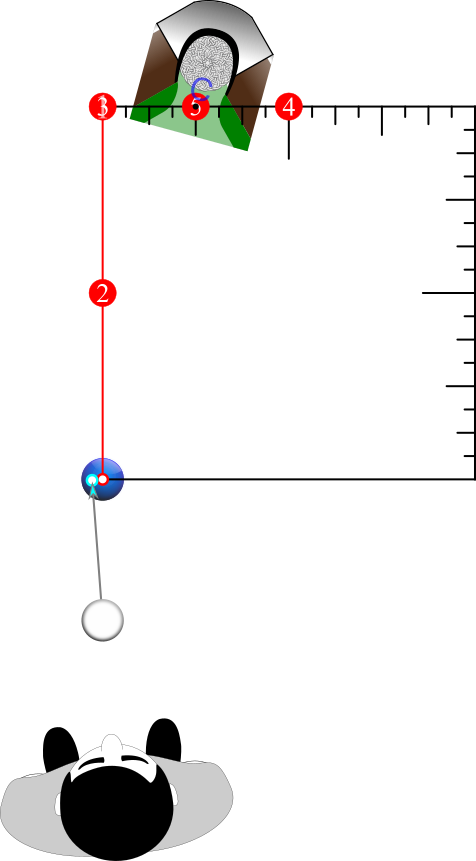
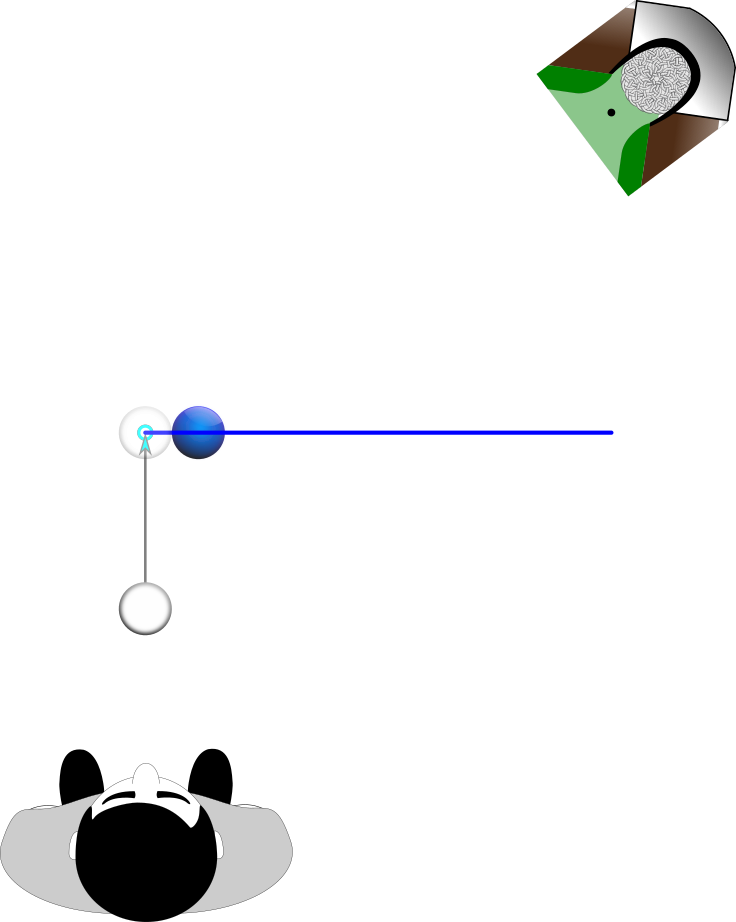
There is an extra factor to consider when drawing the patterns from Position 2. In order to understand this, we must acknowledge the ghost ball position. In the Theory section we learned that the ghost ball is the theoretical position that the cue ball must occupy at the moment it collides with the object ball in order to send the object ball along the release line toward the chosen pocket or target.
With Position 1 and Position 1 pattern variations, the Master Square never moves. The Position 1 near/top corner of the Master Square is positioned at the object ball contact point. Since we are standing along the release line, we remain aligned with the Master Square’s near side at all times and for all shot angles no matter where the cue ball happens to be. For all angles, we remain in the best position to construct the Master Square and all of the patterns that are derived from it. This remains true even for the Position 1-2 and Position 1-3 flipped patterns.
However, in Position 2 we are always aligning ourselves behind the cue ball and facing in the direction of the object ball. But should we really be facing the object ball’s contact point? Or maybe the object ball’s center?
Well, neither of these two alignments is ideal. The reason is that with every shift in the cue ball position, the Master Square’s near/top corner must also shift. And it shifts neither from the object ball’s center nor its contact point. It actually shifts from the center of the ghost ball. So the true location of the near/top corner of the Position 2 Master Square and all of the patterns is not the object ball but actually the ghost ball’s center.
This is why Position 2 has so many standing position variations. Positions 2A, 2A+, 2AB, 2B-, etc. up to Position 2U are all positioned to face their corresponding shot label aims. By aligning ourselves behind the center of the cue ball and facing directly toward any one of these aims, we are automatically facing the ghost ball center.
This is because all of the aims are cue-ball-center aims that send the cue ball’s center along a path that ultimately ends in the ghost ball’s position during collision. So by shifting our standing position to different Position 2 variations, we are automatically shifting the Master Square’s near/top corner and aligning our eyes to look directly along its near side without having to actually find the ghost ball’s center.
These Position 2 adjustments become more and more important as the distance between the cue ball and object ball decreases. If the two balls are several feet or more away from one another, it is not as important to use the position variations during the process of detecting the shot label. But when the balls are close to one another, the variations become essential. We will go deeper into ball proximity considerations later under the Adjustments topic heading. For now we will focus on the process of Position 2 standing adjustments.
Adjusting to find the shot label from Position 2 is a quick process once you get the hang of it, but let’s take it slowly to start. Here are two methods described step by step.
Method 1
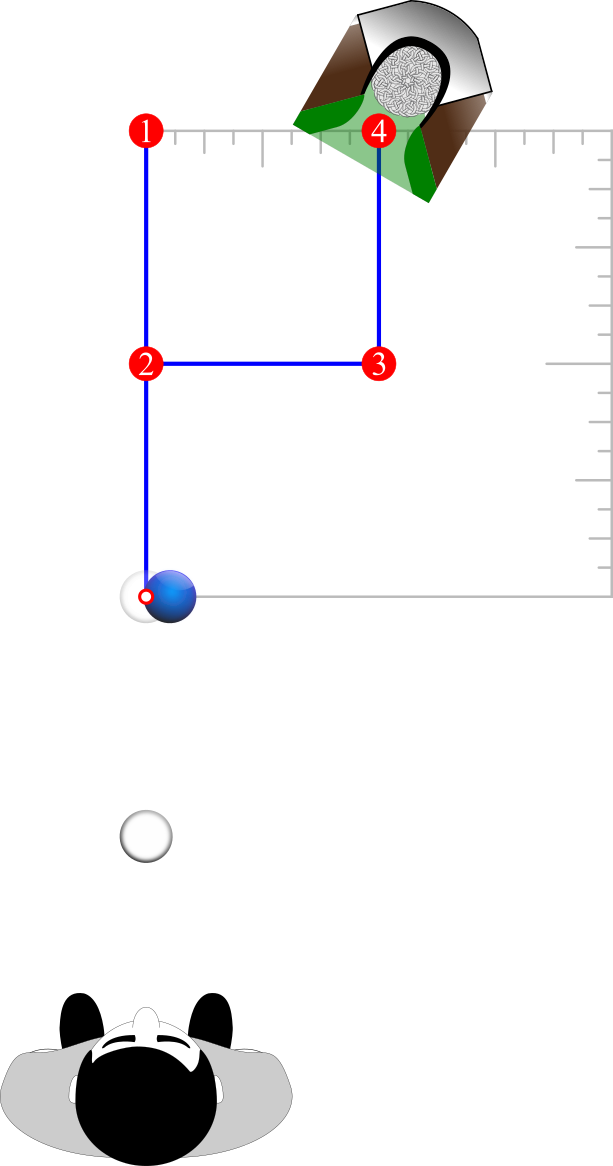
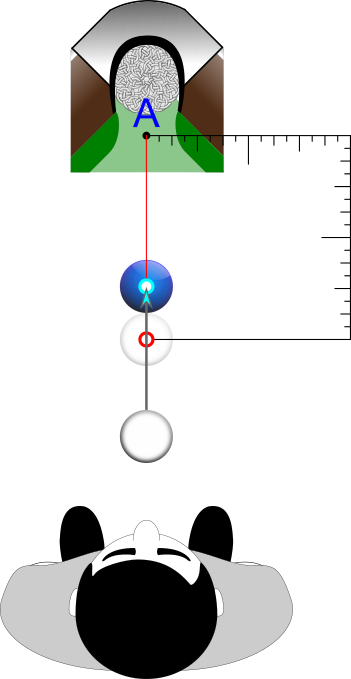
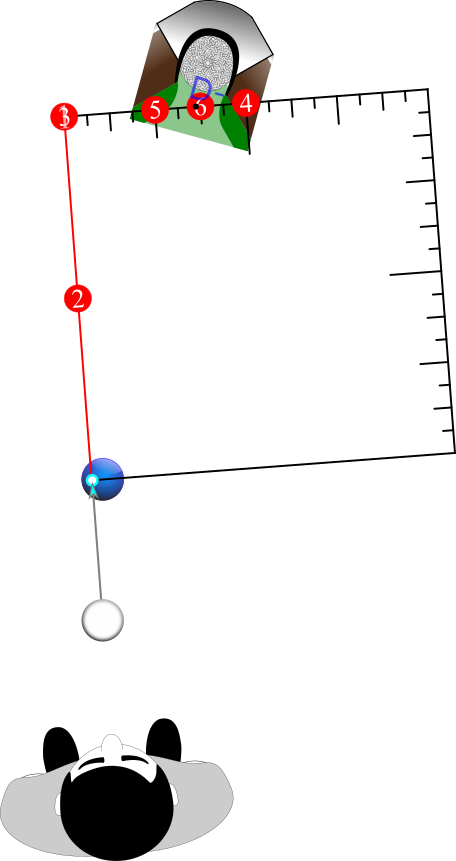
Step 1—Before any adjustments, we can begin by standing in Position 2(A) where we are aligned with the cue ball and object ball centers. From this preliminary position, we can draw any pattern sequence to find a temporary shot label.
Example: Using hL-subpattern Sequence 1, we find the shot label to be ‘C’.
Step 2—Now that we have a temporary shot label to work from, we adjust our standing position so that our alignment is now behind the center of the cue ball but facing in the direction of the temporary shot label’s aim.
Example: We are now standing in Position 2C.
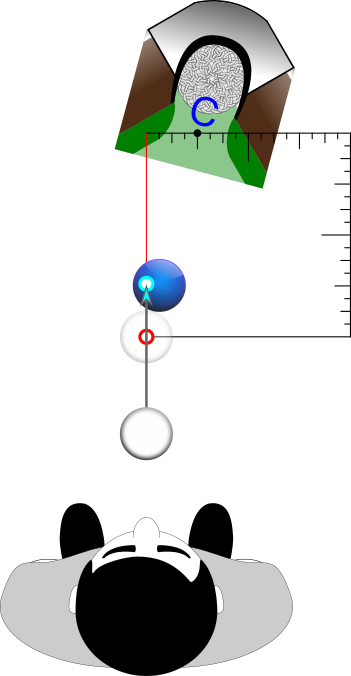
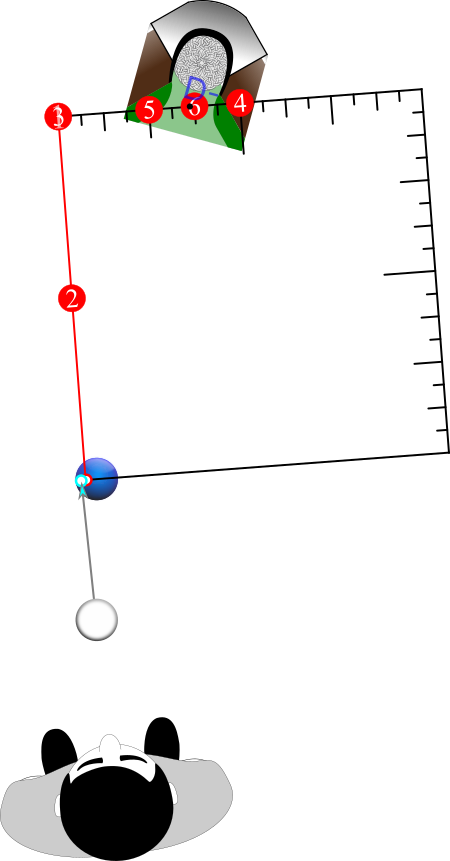
Step 3—From our newly adjusted position we draw the pattern sequence again, but rather than starting the sequence from the object ball center, we draw it from the temporary shot label aim that is to the side of the object ball center. After the second drawing of the pattern sequence, the new shot label we find becomes our new temporary shot label.
Example: Using hL-subpattern Sequence 1, we find the new shot label to be ‘D-’.
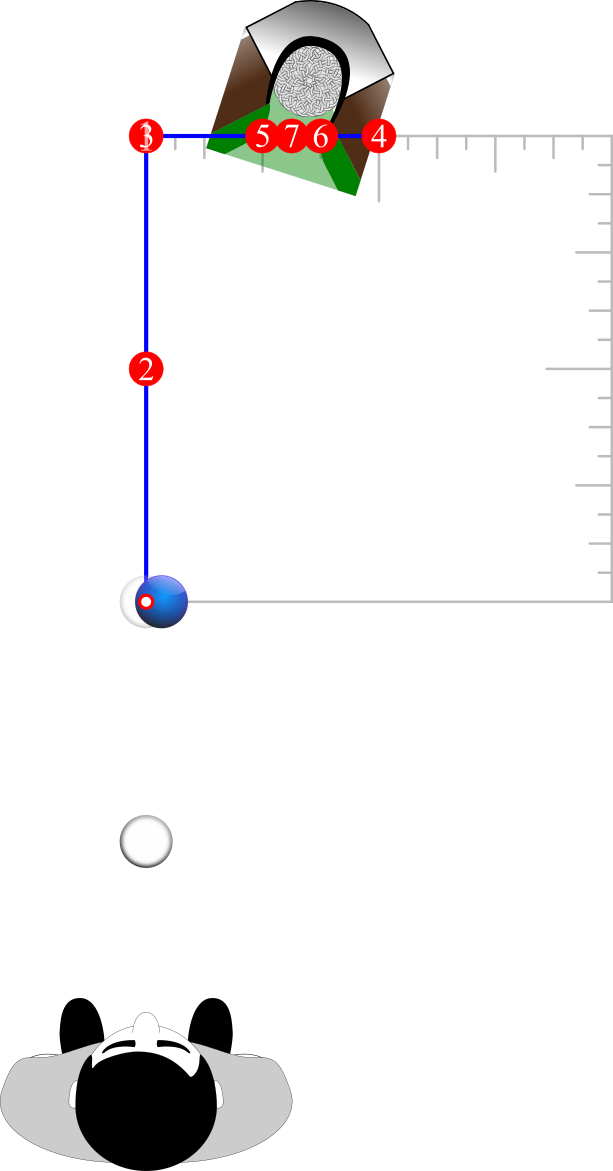
Step 4—We adjust our standing position again to match the new temporary shot label.
Example: We are now standing in Position 2D-.
Step 5—We draw again but starting from the new temporary shot label aim. After drawing we again find a new temporary shot label.
Example: Using hL-subpattern Sequence 2, we find the new shot label to be ‘D+’.
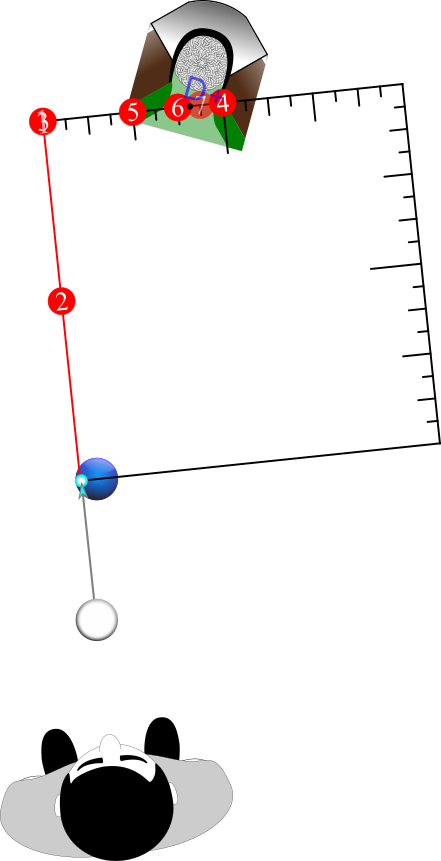
Step 6—We continue in this way until the shot label matches our current standing position. When it matches, we have not only found the actual shot label but also the aim and standing position for our current shot. Theoretically, we can step into the shot from there and shoot.
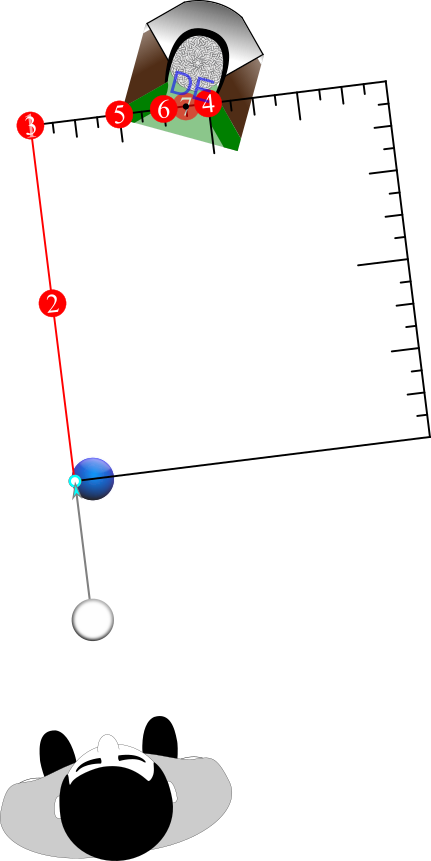
Example: Standing in Position 2D+ and using hL-subpattern Sequence 2, we find the shot label to be ‘DE’. Using the sequence once again from ‘DE’, we find the shot label to be ‘DE’ which is a perfect match. We step and bend into the shot from Position 2DE and pot the object ball.
When working with Method 1, the position to position adjustments will always be in one direction—from shallower shot angle labels to steeper shot angle labels until the perfect match is found.
Method 2
When working with Method 2, the position adjustments will also be in one direction, but they can go from shallower to steeper shot labels or from steeper to shallower shot labels until the perfect match is found.
Step 1—Rather than standing in Position 2(A) we can begin at any Position 2 variation. From this preliminary position, we can draw any pattern sequence to find a temporary shot label.
Example: We begin by standing in Position 2Q. Using w-subpattern Sequence 3, we find the shot label to be ‘EF’.
Step 2—Now that we have a temporary shot label to work from, we adjust our standing position to this new label’s aim.
Example: We are now standing in Position 2EF.

Step 3—From our newly adjusted position we draw the pattern sequence again starting from the temporary shot label aim. The shot label we find becomes our new temporary shot label.
Example: Using w-subpattern Sequence 3 we find the new shot label to be ‘E+’.
Step 4—We continue in this way until the shot label matches our current standing position.
Example: Eventually, standing in Position ‘E’ and using h pattern Sequence 1 we come up with a shot label match of ‘E’. We step and bend into the shot from Position 2E and pot the object ball.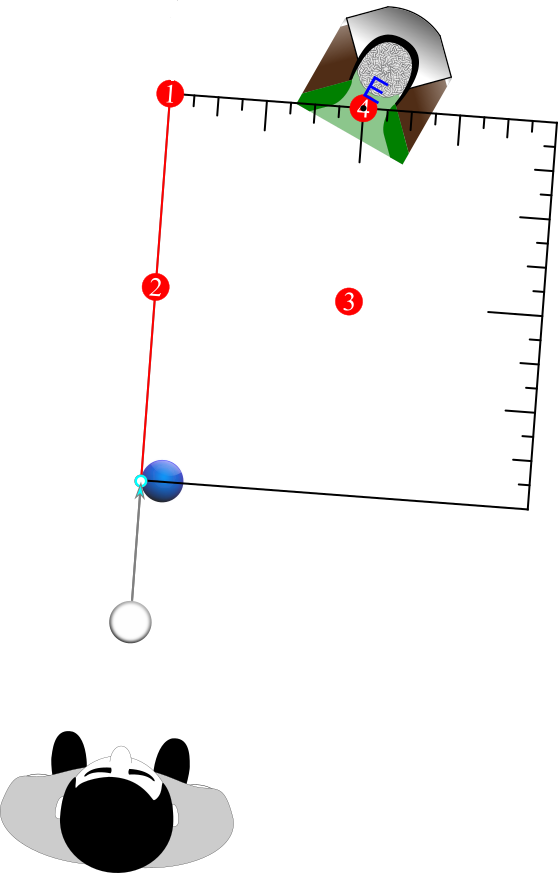
Method 2 shows us that we can start from any Position 2 variation. After a quick glance at a shot setup, we may be able to estimate what the shot label might be. We can then choose to start from the Position 2 variation that matches our estimated shot label and adjust from there.
Another option is to start from a helpful reference label. Suggestions:
‘Q’ is helpful because its shot angle measures 45° which is halfway between the 0° and 90° measurement extremes of shot labels ‘A’ and ‘U’.
‘E’ is helpful because it offers the quick-to-locate object ball’s edge as its aim, and it also lies halfway along the Master Square’s bottom side between shot labels ‘A’ and ‘Q’.
‘C’ is helpful because it lies halfway between shot labels ‘A’ and ‘E’, and its aim is also fairly quick to locate, being halfway between the object ball center and edge.
For shots 45° or over, ‘U’ is very helpful as the preliminary Position 2 variation. When standing at Position 2U, we can very easily visualize what would be the most extreme release line, which is 90° sideways. Drawing from ‘U’ along this line and stopping when it is below the pocket center, we are drawing the top side of a temporary Master Square.
Continuing any Over 45° sequence from there, we find our temporary shot label.
In Step 6 of Method 1, I mention that once we find the shot label that matches our current Position 2 variation we can “theoretically” step and bend into the shot and shoot to pot the object ball. The reason this is only theoretical has to do with two factors:
1-You will need to adjust for the effects of various playing conditions that you will discover for yourself when you follow the practice methods taught in the Training section.
2-The aims used for the Position 2 variations pass through theoretical ghost ball centers and not friction-adjusted ghost ball centers.
For now I will simply suggest that once you find a shot label that matches your current Position 2 variation, you will probably need to align to a slightly steeper shot label aim before shooting in order to pot the object ball.
