Everything on the CueAndMe.com website is being freely shared with the sincere hope that those who find value in it will return to the Donate page above and donate what they feel is appropriate. Please help me to get the word out by sharing CueAndMe.com with other players.

Thank you, and enjoy!

Practice Tools for Pool, Snooker, and Carom Billiards

Download and Print These Free Precision Training Aids to Improve Your Aim, Alignment, Cue Stroke, and Shooting Skill

Throtractor Pool, Snooker, Carom Billiards Practice Tool
Throtractor
RotoThrotractor Pool, Snooker, Billiards Practice Tool
RotoThrotractor
The Gauntlet Pool, Snooker, Billiards Practice Tool
The Gauntlet
RotoThroBro Pool, Snooker, Billiards Practice Tool
RotoThroBro
PortaGuards Pool, Snooker, Billiards Practice Tool
PortaGuards
Frangle Rock Landscape Orientation
Frangle Rock

Download the package for the game that you play.

All packages include the same 9 tools in .pdf format. The only differences are the standard ball dimensions that were used when designing the tools for each game—57.15mm pool, 52.5mm snooker and 61.5mm carom ball diameters. Therefore, downloading a package that does not match the game you play would yield inaccurate results and probably cause more harm than good!

IMPORTANT: Printer must be set to print “actual size.” Do not use any setting that stretches or shrinks the tools, such as “best fit” or “stretch to page.” All of the tools except for Frangle Rock must be printed using landscape orientation. Frangle rock should be printed using portrait orientation.

When printed properly the 9mm to 16mm lines shown on the tools will measure accurately. If they do not, correct your printer settings. Do not use the tools if they do not print at actual size!

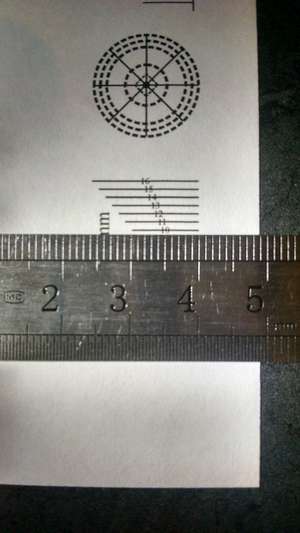
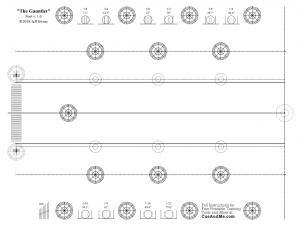
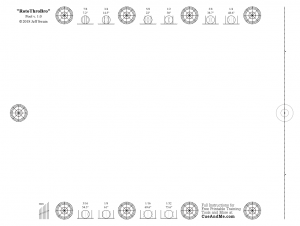
Print 2 copies each of The Gauntlet and RotoThroBro. One will be used for shots angled to the left and the other for shots angled to the right.

The 3 “LEDGER” files are larger-sized options for RotoThrotractor, The Gauntlet, and RotoThroBro if you have access to an A3 or Ledger/Tabloid printer. These larger versions must also be printed in landscape orientation.

Although not necessary, paper with a heavier weight may improve performance for RotoThrotractor, The Gauntlet, and RotoThroBro. This may be especially true on table felt that has a thicker nap.

If you would like to preserve your tools using lamination, consider choosing thin lamination products for RotoThrotractor, The Gauntlet, and RotoThroBro. The thicker lamination products do not allow these tools to connect properly to one another. However, thicker lamination for the remaining tools would not affect their performance.

About The Tools

I wanted to make these printable billiard training tools available to everyone everywhere, from beginners to professionals. Don’t be put off by their odd appearance. They can be powerful aids to help sharpen our games, regardless of our current playing level. They can also be used by developers to test new ideas and instructional systems.

I will do my best to guide you step by step towards mastering these tools. Video instructions are likely coming soon to my YouTube channel.

Before I go into the tools themselves, I think it’s a good idea to give a brief explanation of a few cue sport concepts to get those of you who are unfamiliar up to speed, because the tools make good use of them.

Click this button if you’d like to skip this and go straight to the tools.

What are Ball Fractions and Fractional Aiming?

Technically, there are an infinite number of angles between the 0° straight shot and the (nearly) 90° ultra-thin cut shot. We should be able to play any angle that arises during our games, so how do we practice an infinite number of angles? Well… technically we can’t.

Practically, however, we can choose to take that 0-90 degree infinite range and cut it up (pretty evenly) into a smaller number of manageable slices. We can then practice these few slices or “reference shots” until we easily recognize them in any situation. When we are presented with a shot whose angle appears to lie in-between two of our reference shots, we can simply make an adjustment by aiming somewhere in-between the aims that we practiced for those two reference shots.

There are many methods of aiming, but Fractional aiming is a method that uses what we call “ball fractions” as these reference shots.

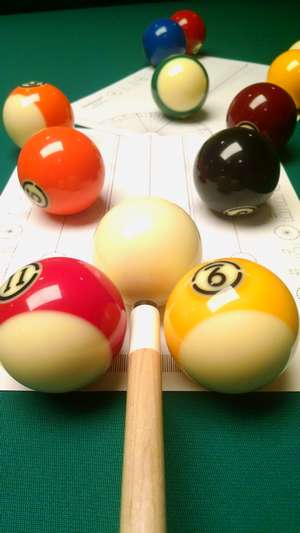
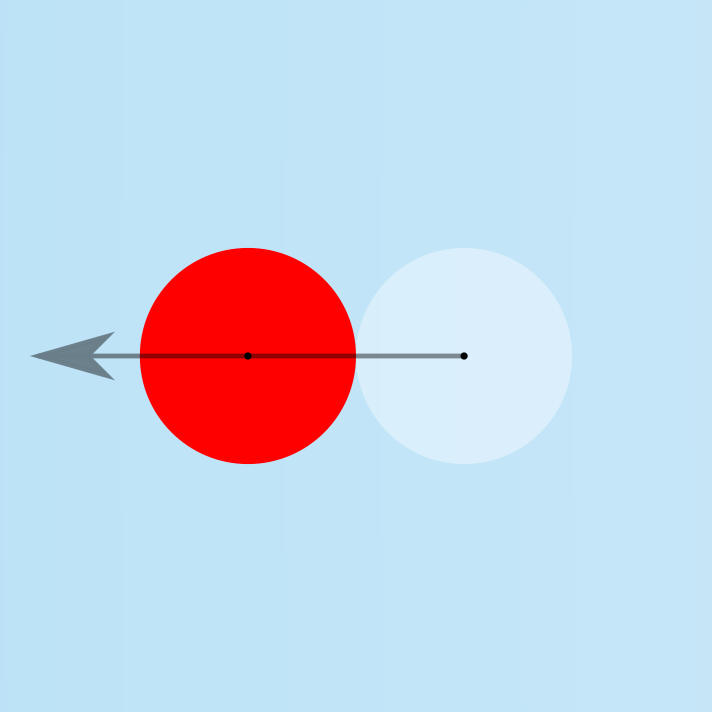
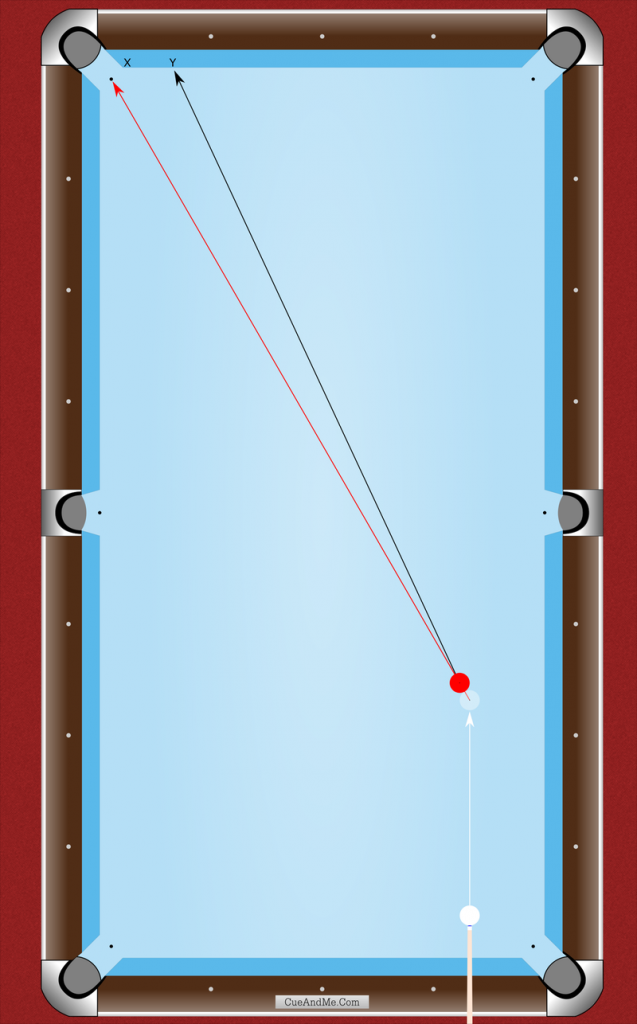
Viewed from the perspective of the shooter’s eyes near the level of the table, at the moment the cue ball collides with the object ball the cue ball will cover (or eclipse) some portion of the object ball depending on the shot at hand. We can use fractions to describe how much of the object ball is being eclipsed by the cue ball.

For example, if at the moment of impact the cue ball is covering half of the object ball, we would call that a 1/2-ball shot. If the cue ball is covering 3/4 of the object ball, we would call that a 3/4-ball shot. If the cue ball is covering only 1/8 of the object ball it would be a 1/8-ball shot. And so on. 
Note: If the cue ball is covering the entire object ball, it would be a 1/1 fraction, but we just call that a full-ball shot.

If you were fast enough to be able to draw a line between the centers of the cue ball and object ball at the very moment that they collide,

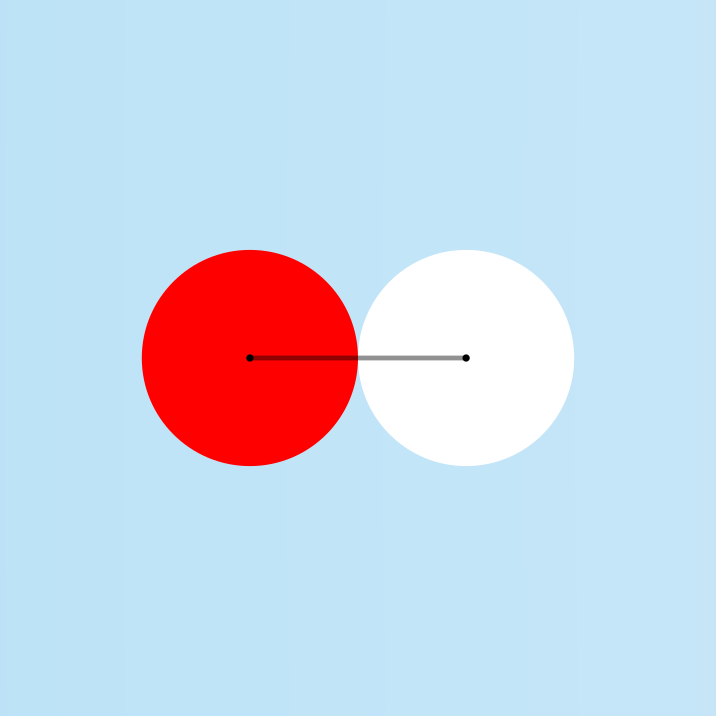
the object ball would theoretically travel (release) along an extension of this line after the collision.

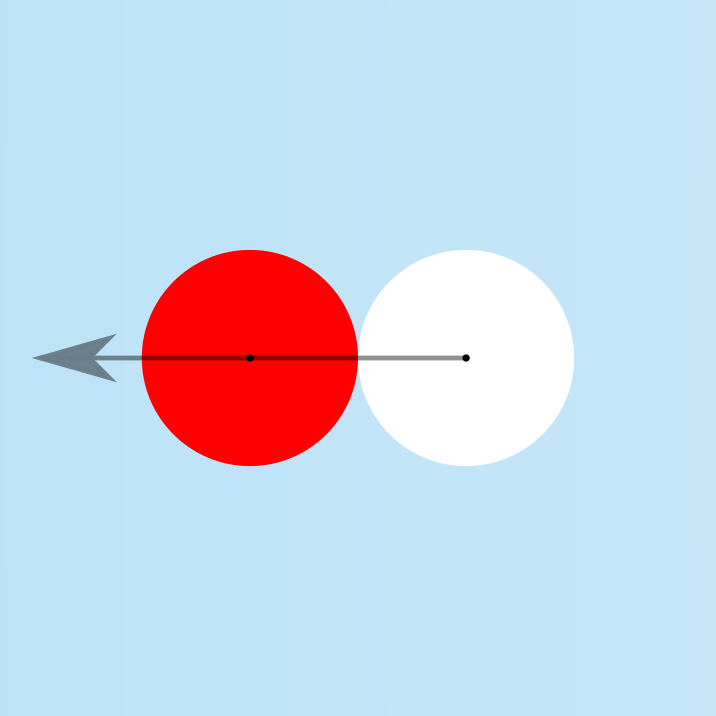
This holds true for all shots.

But when we consider this object ball release line in relation to the cue ball’s path before the collision…

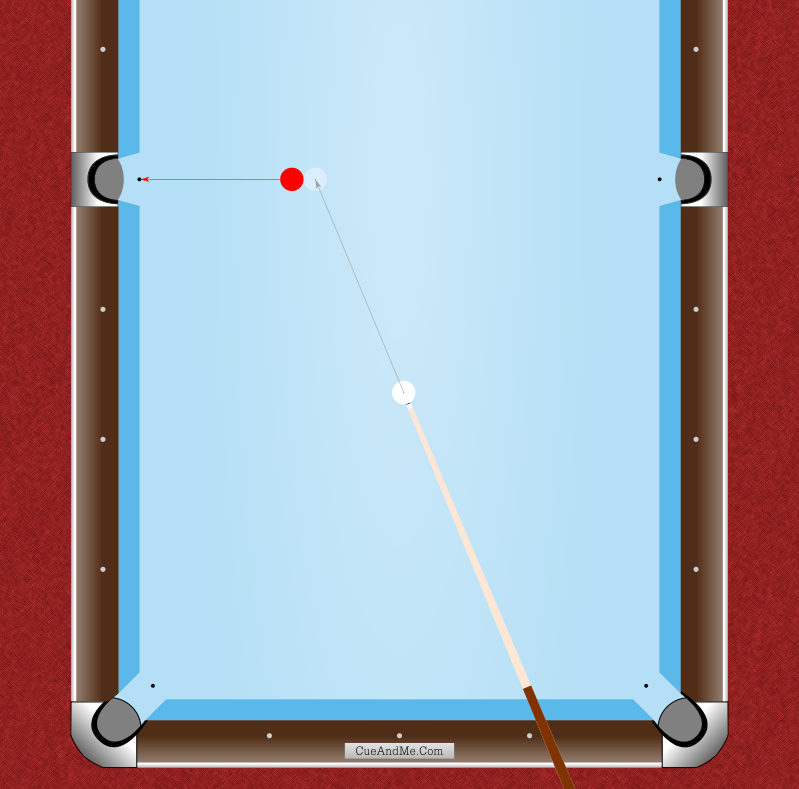
…each shot suddenly reveals its unique angle.

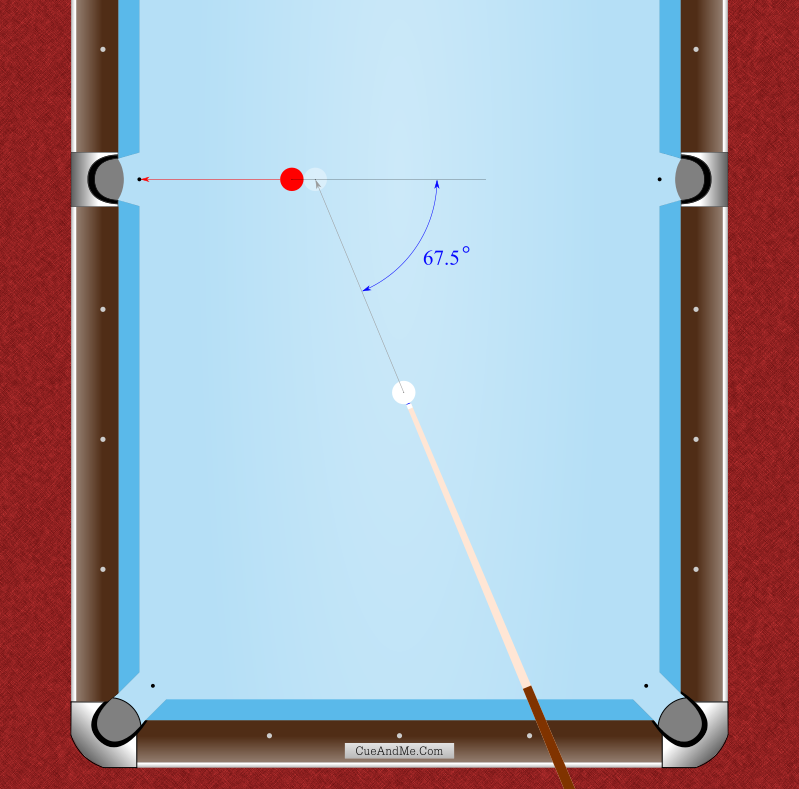
So this means that each ball fraction has its own unique angle of object ball release relative to the line along which the cue ball was traveling before the collision. Knowing this, we can pair each ball fraction reference with its theoretical object ball release angle. Don’t worry; You don’t have to measure the angles. I’ve already done that for you.

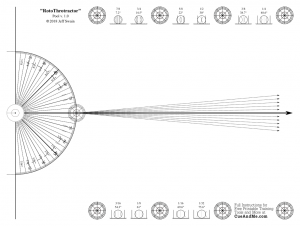
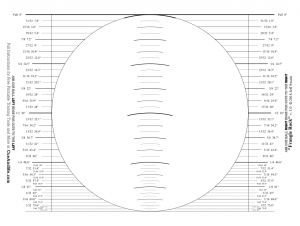
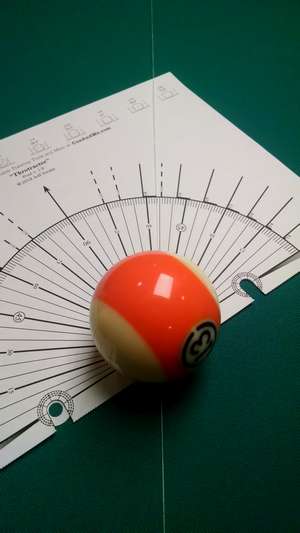
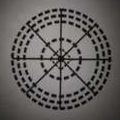
Below are 8 of the most common ball fraction reference shots alongside their unique theoretical angles. (One of the printable tools, Frangle Rock, is a much more complete ball fraction aiming reference showing 42 ball fractions and their associated angles if you want to go much deeper and practice more “in-between” references, but the 8 references below are plenty to get you up and running.)

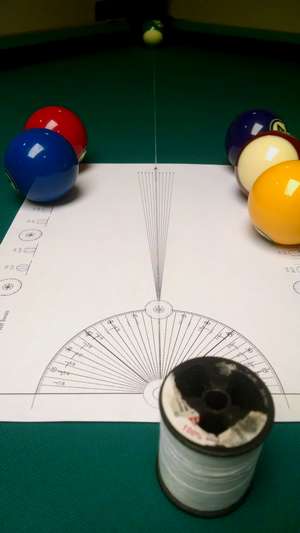
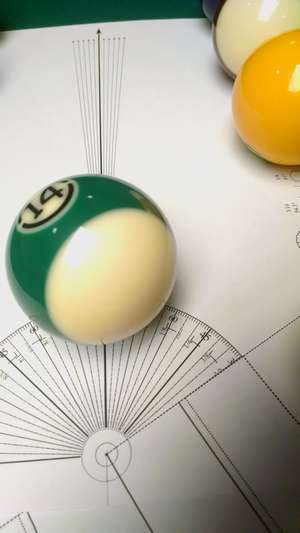
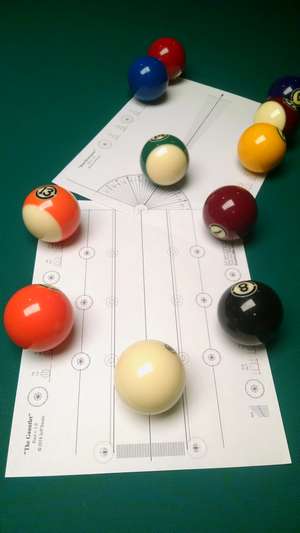
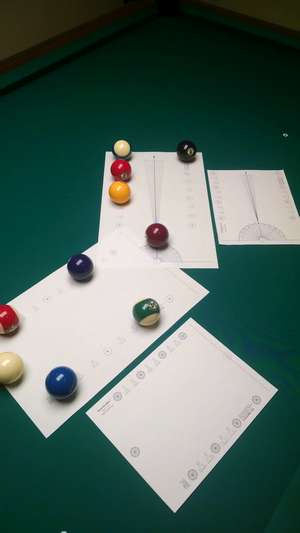
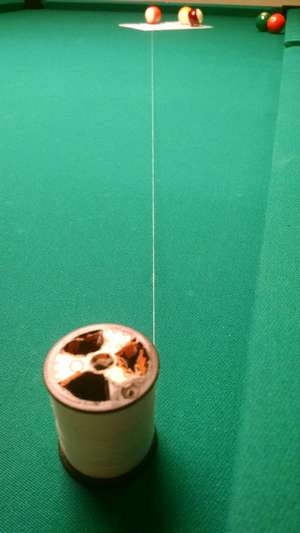
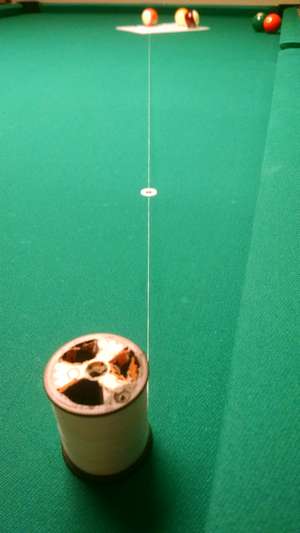
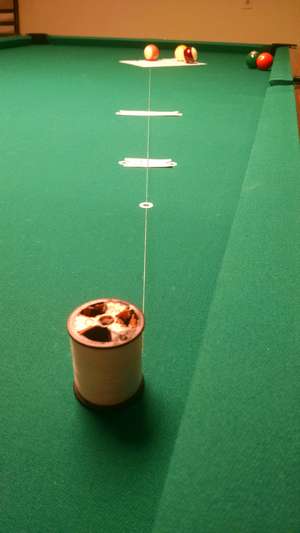
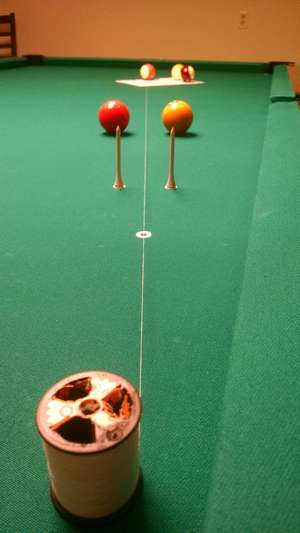
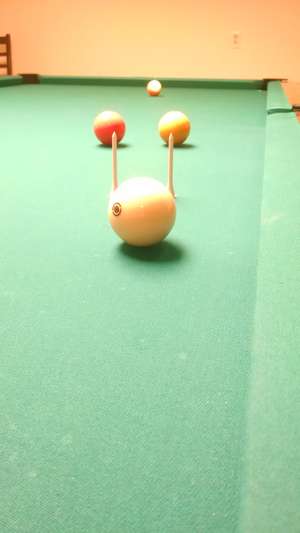
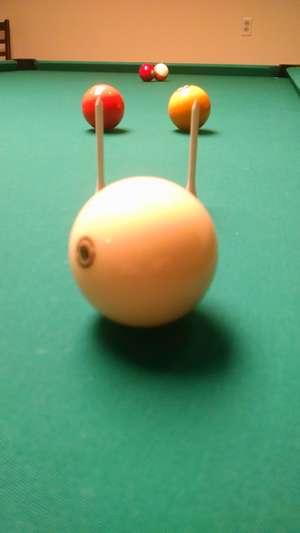
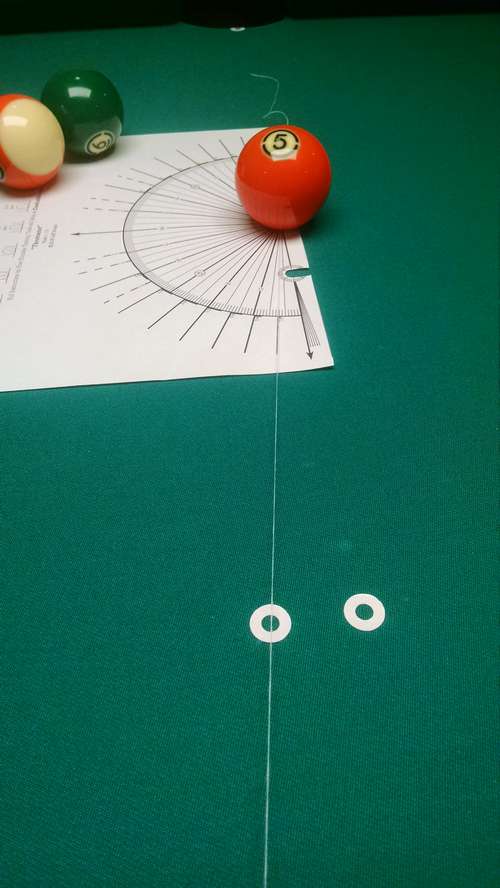
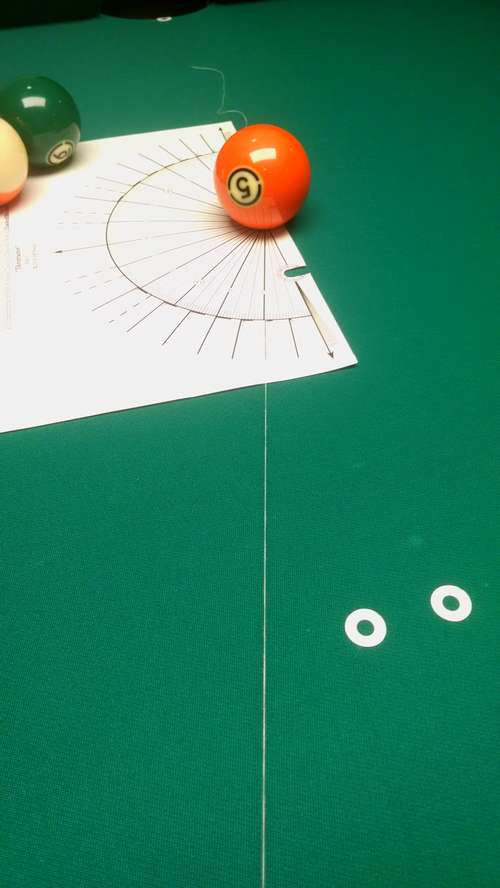
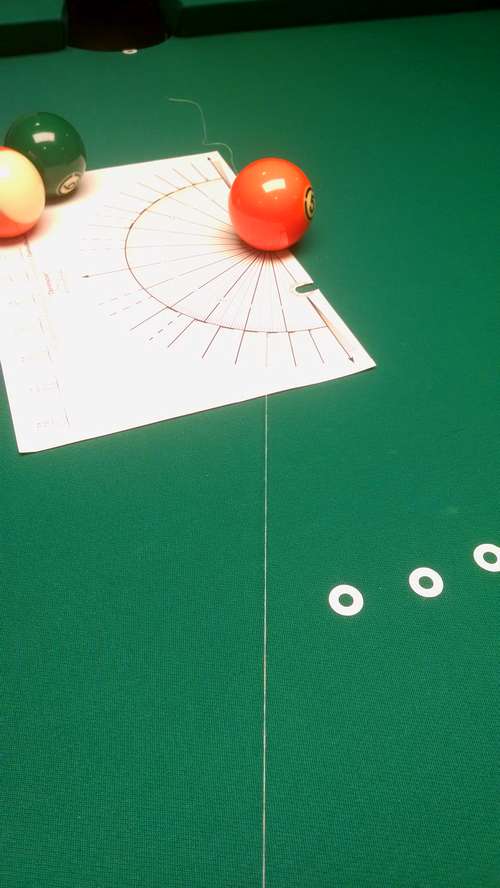
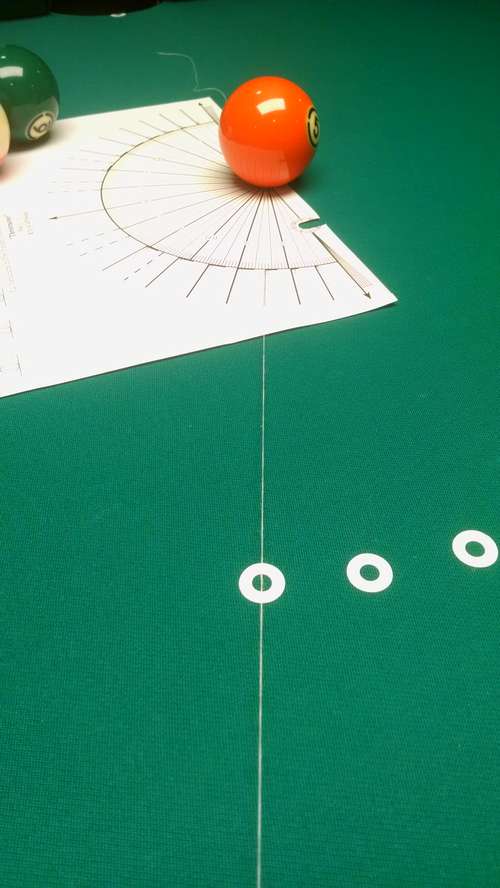
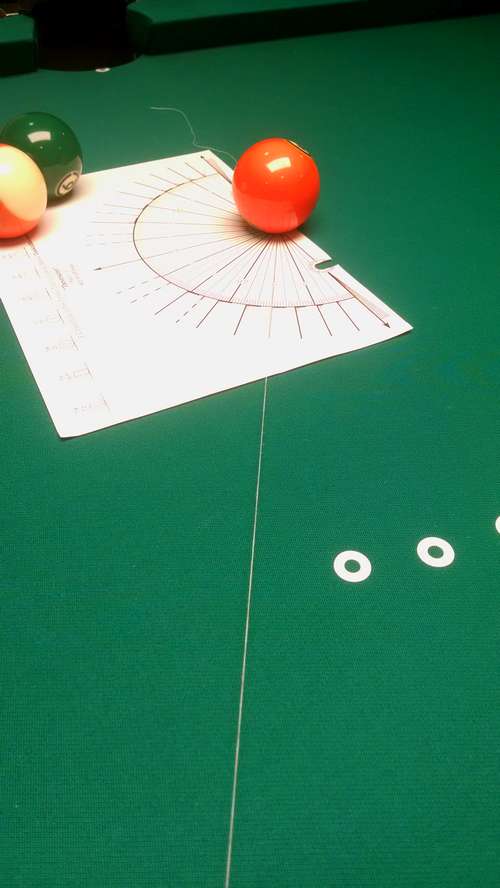
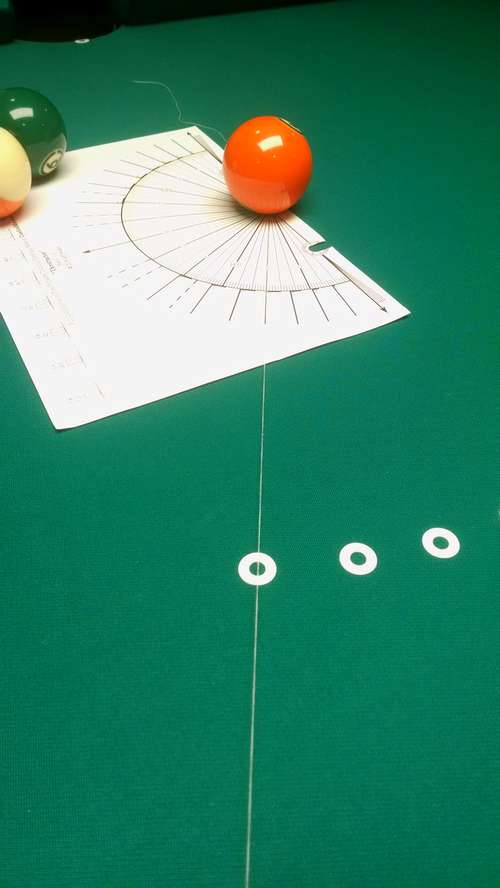
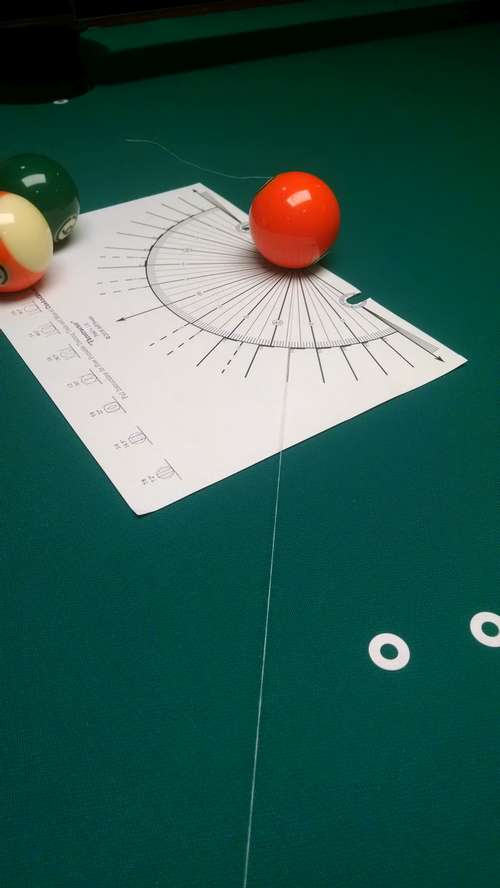
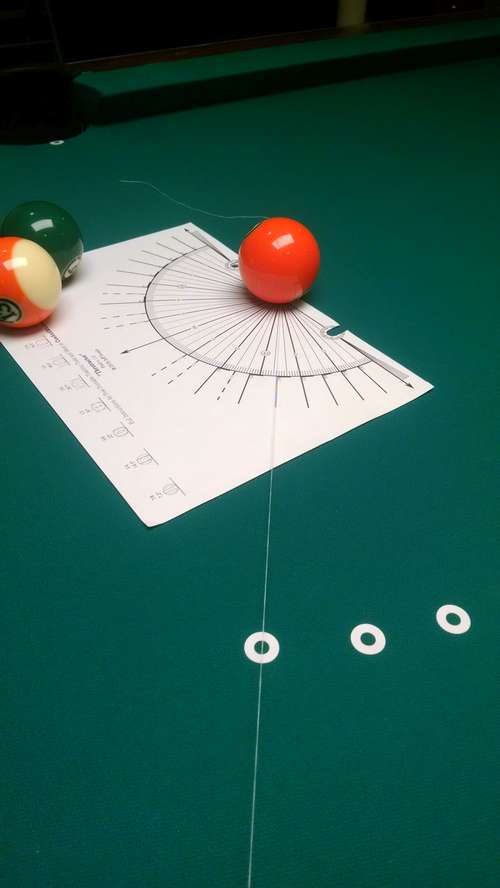
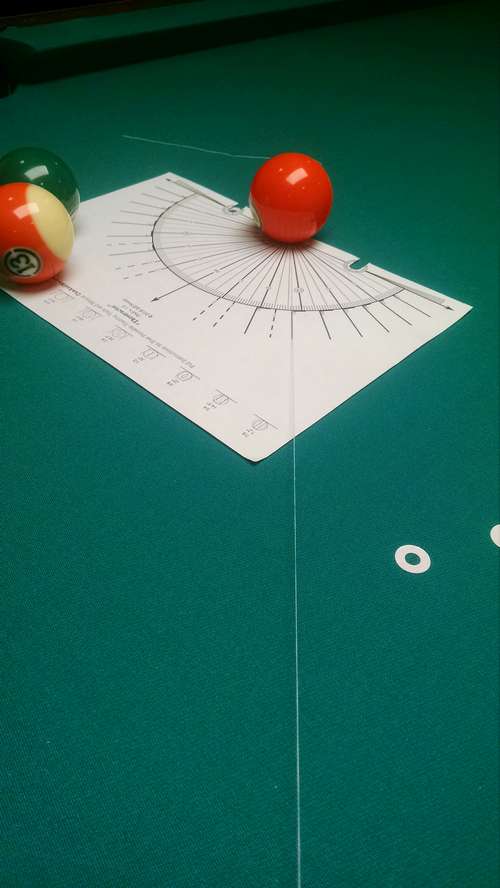
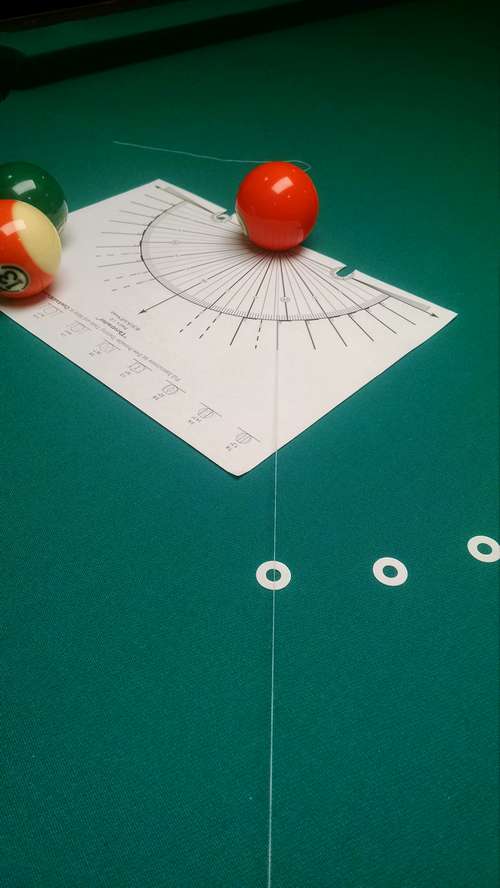
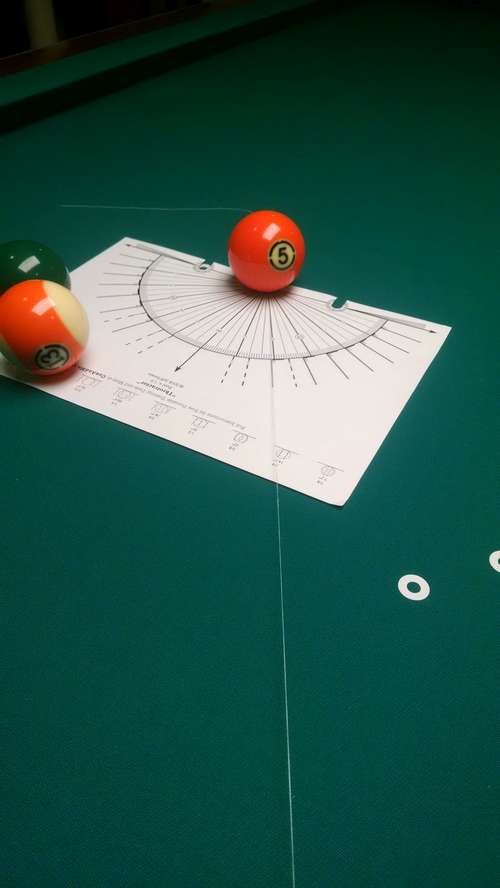
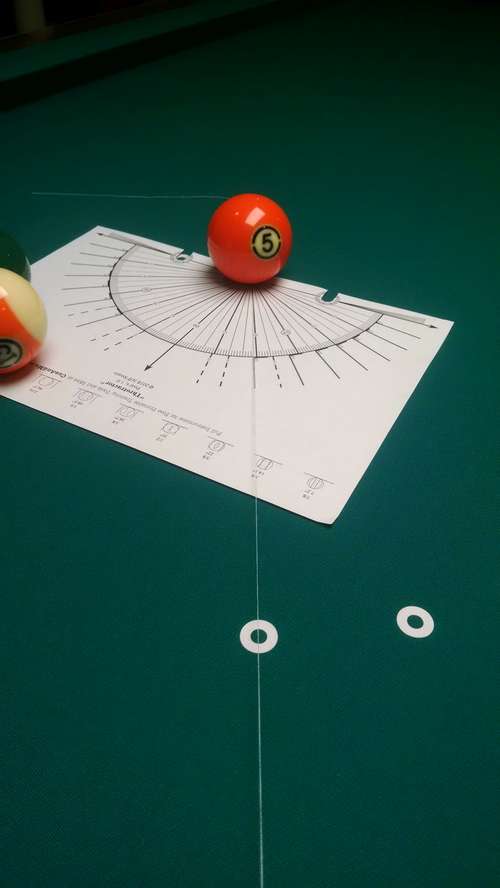
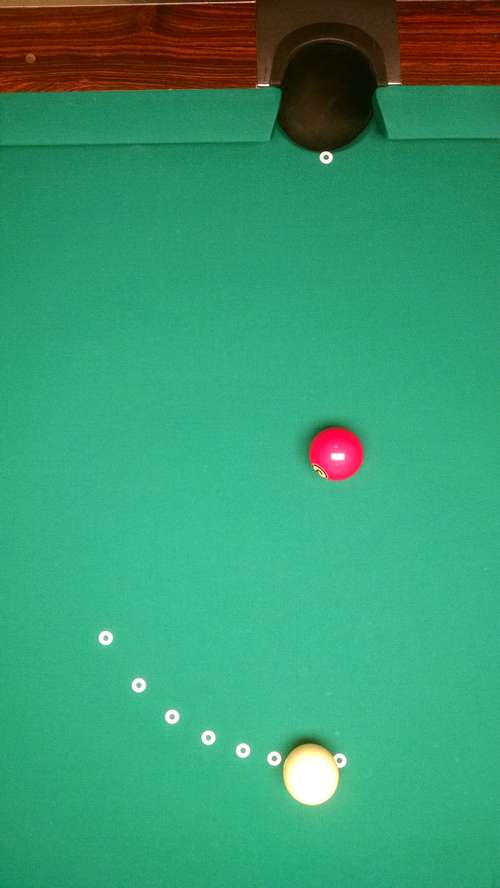
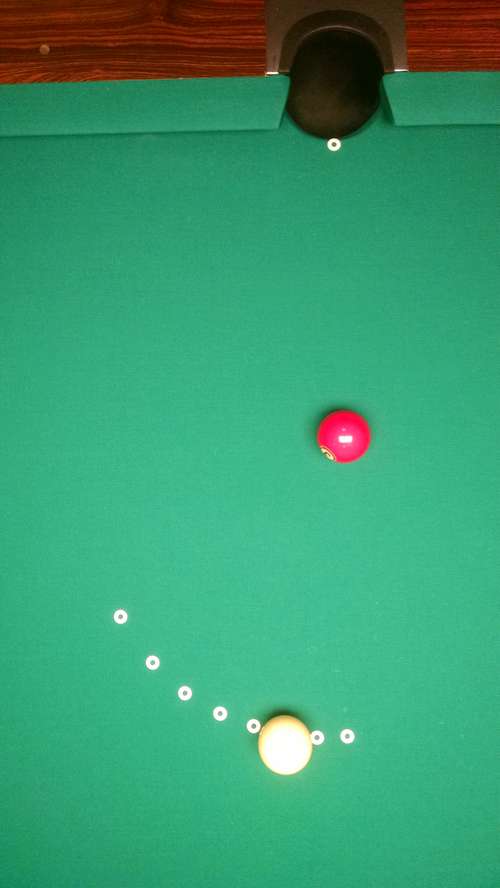
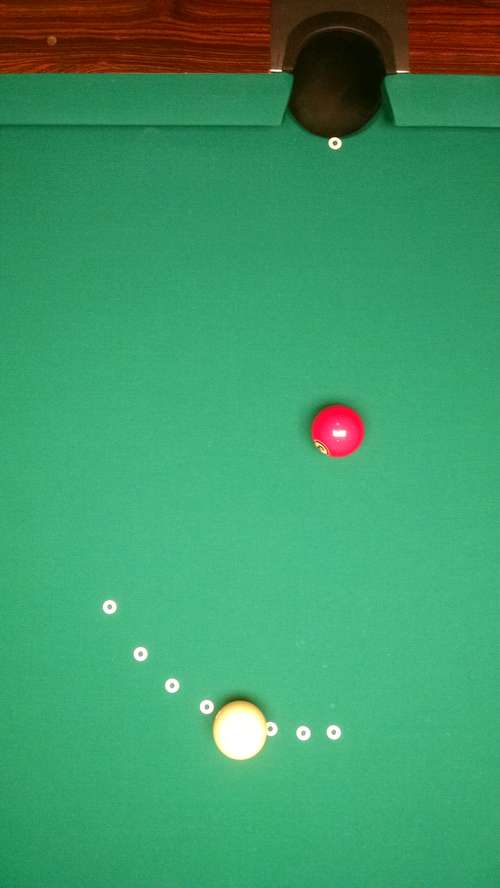
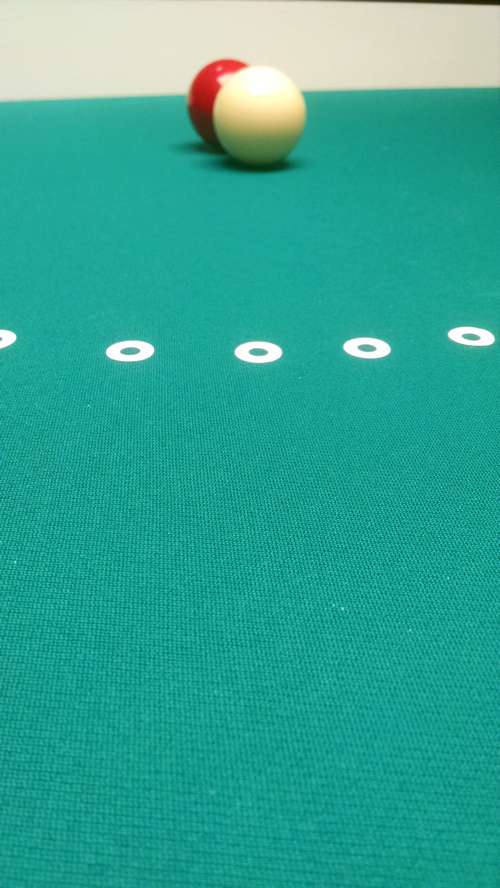
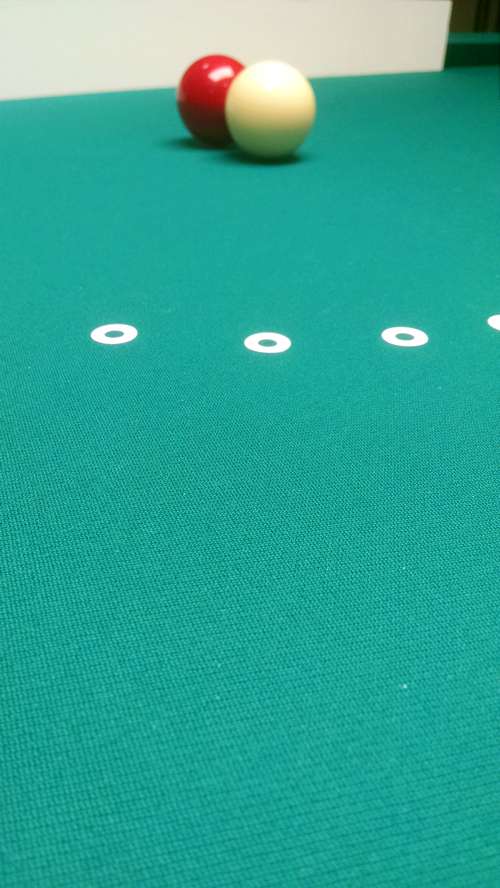
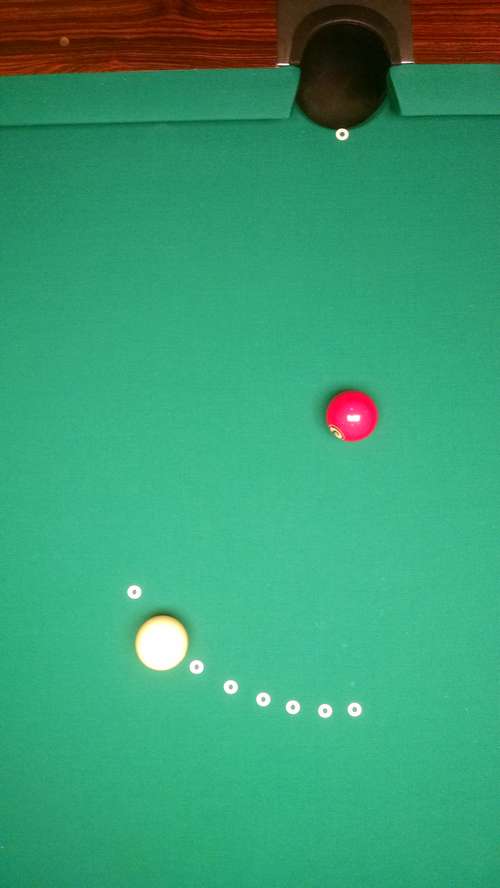
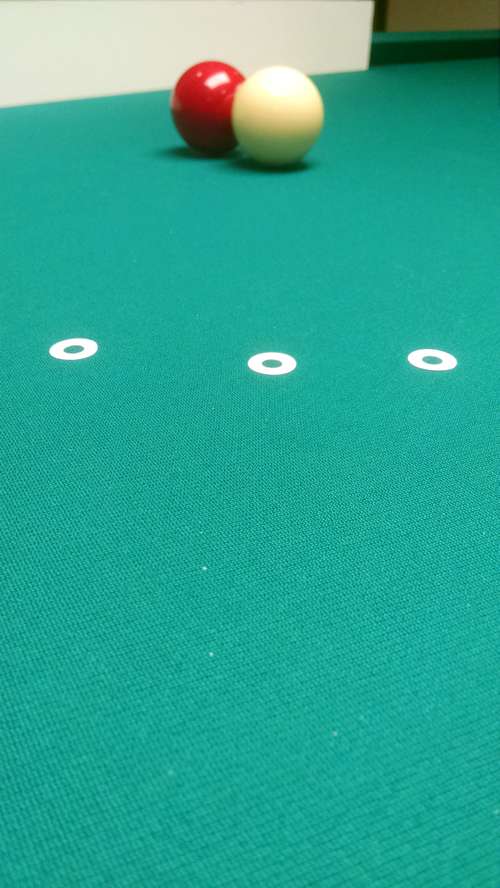
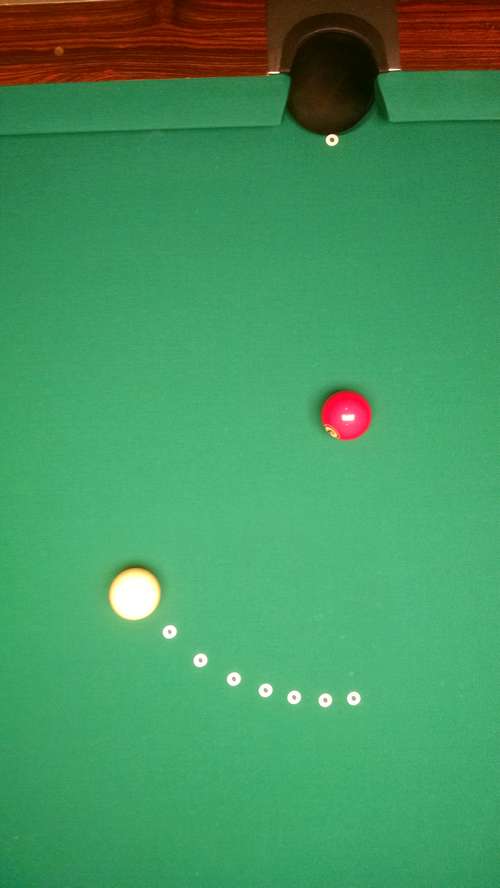
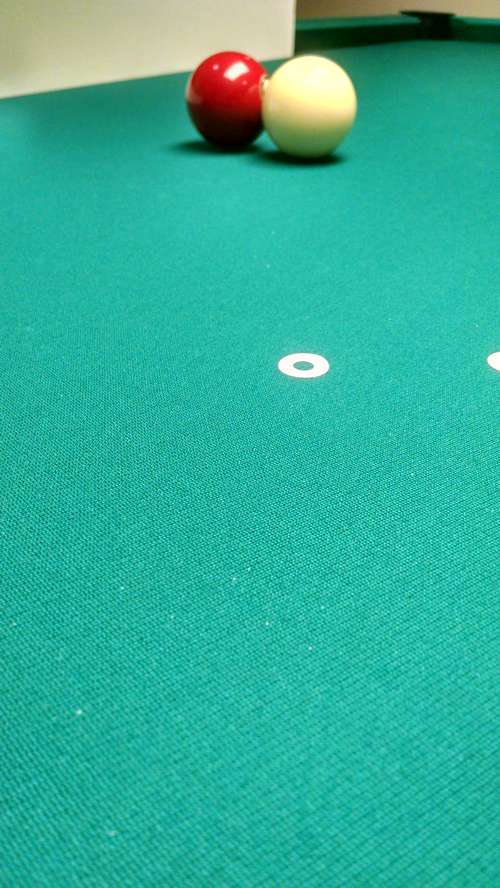
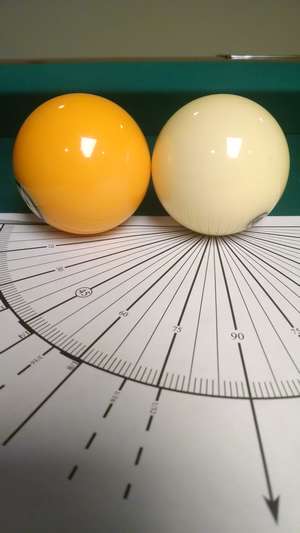
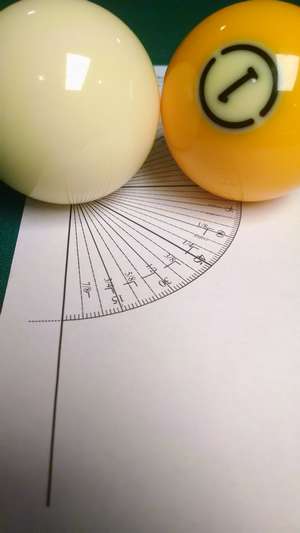
In the animated photo gallery below you can see that I used one of the tools called Throtractor, which includes spokes at these common ball fraction angles to accurately mark the table with hole reinforcement labels for repeated practice of these 8 reference shots.

Once you’ve marked the table as I did here, you can get a feel for these reference shot fractions by practicing them over and over again from the same position.

Here I mark the table with Throtractor for the 8 most common ball fraction reference shots

8 Common Ball Fractions To Be Used as Reference Shots

Each of the reference shots below show an overhead picture as well as a picture of the fraction of the object ball being eclipsed by the cue ball. Note that the cue ball appears larger than the object ball because it is somewhat closer to the viewer. As the shot angle increases, the two balls look more similar in size, because they are closer to being side-by-side than single-file. I mention this because this phenomenon effects to some degree how the eclipses appear.

Full-Ball Shot 0°

Fractional Aiming Overhead Full Ball Billiard Shot
Fractional Aiming Full Ball Showing Cue Ball Total Eclipsing Object Ball

7/8-Ball Shot 7.2°

Fractional Aiming Overhead 7/8-Ball Billiard Shot
Fractional Aiming Seven Eighths Ball Fraction

3/4-Ball Shot 14.5°

Fractional Aiming Overhead 3/4-Ball Billiard Shot
Fractional Aiming Three Quarters Ball Fraction

5/8-Ball Shot 22°

Fractional Aiming Overhead 5/8-Ball Billiard Shot
Fractional Aiming Five Eighths Ball Fraction

1/2-Ball Shot 30°

Fractional Aiming Overhead Half Ball Billiard Shot
Fractional Aiming One Half Ball Fraction

3/8-Ball Shot 38.7°

Fractional Aiming Overhead 3/8-Ball Billiard Shot
Fractional Aiming Three Eighths Ball Fraction

1/4-Ball Shot 48.6°

Fractional Aiming Overhead 1/4-Ball Billiard Shot
Fractional Aiming One Quarter Ball Fraction

1/8-Ball Shot 61°

Fractional Aiming Overhead 1/8-Ball Billiard Shot
Fractional Aiming One Eighth Ball Fraction

What is the Ghost Ball?

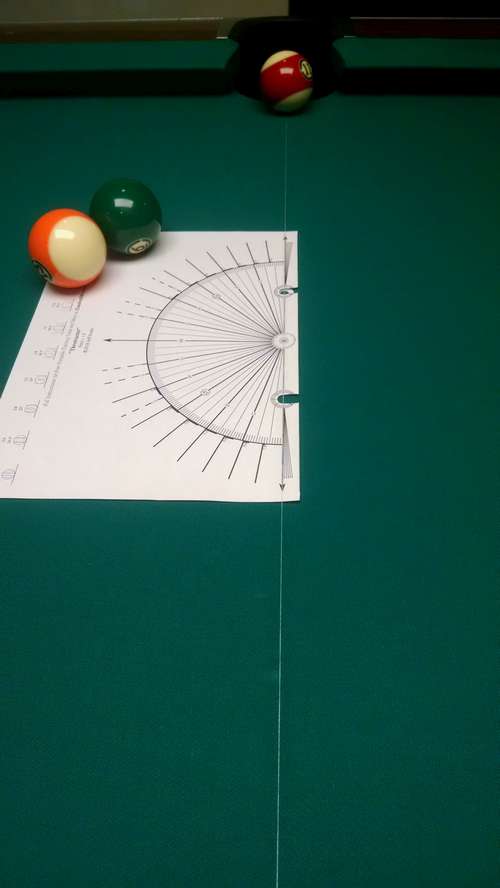
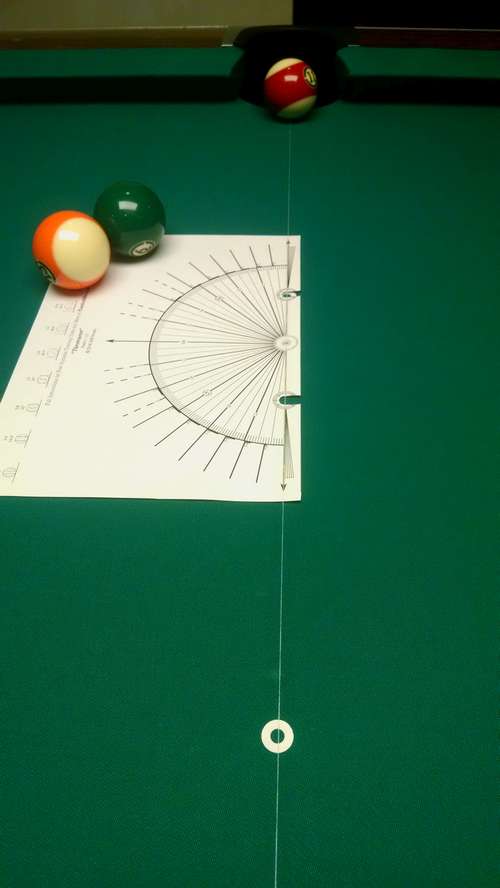
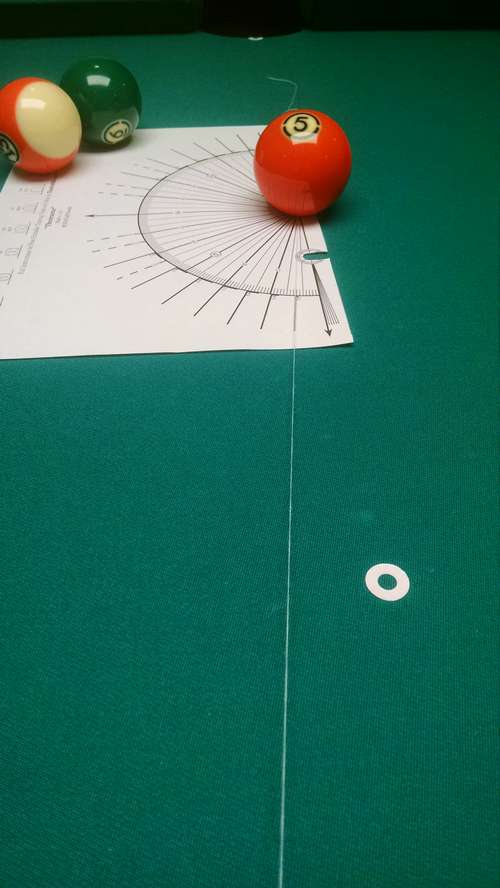
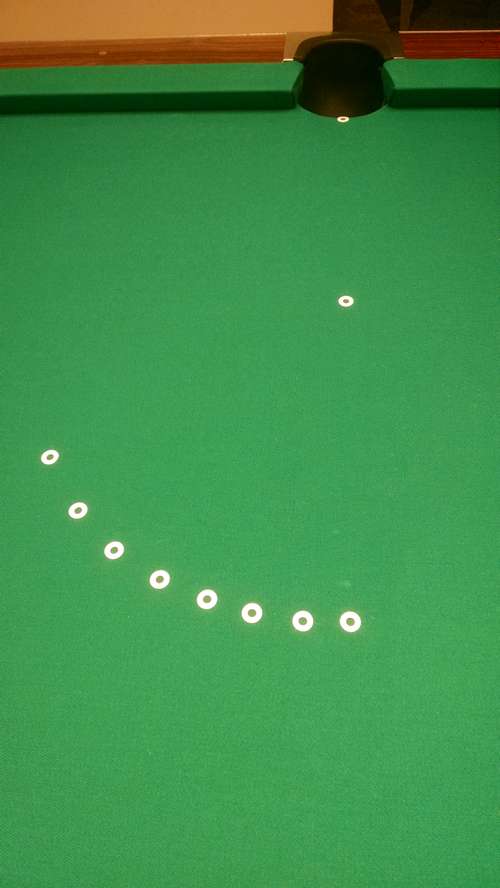
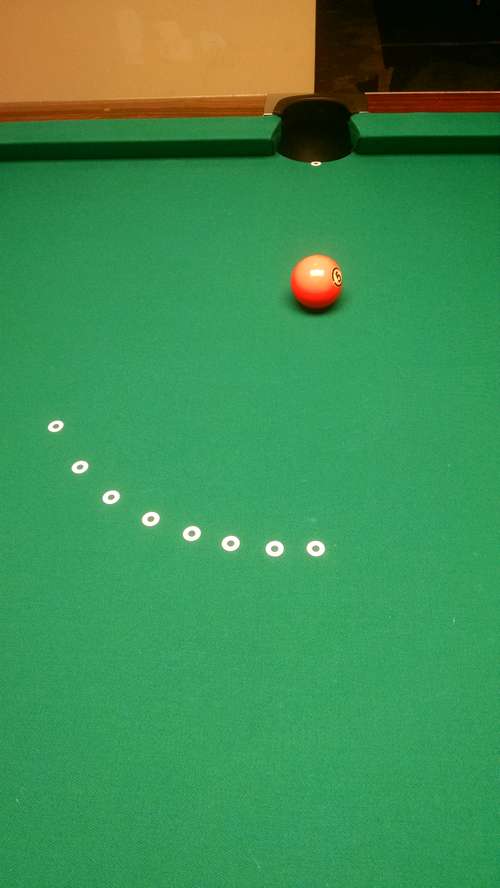
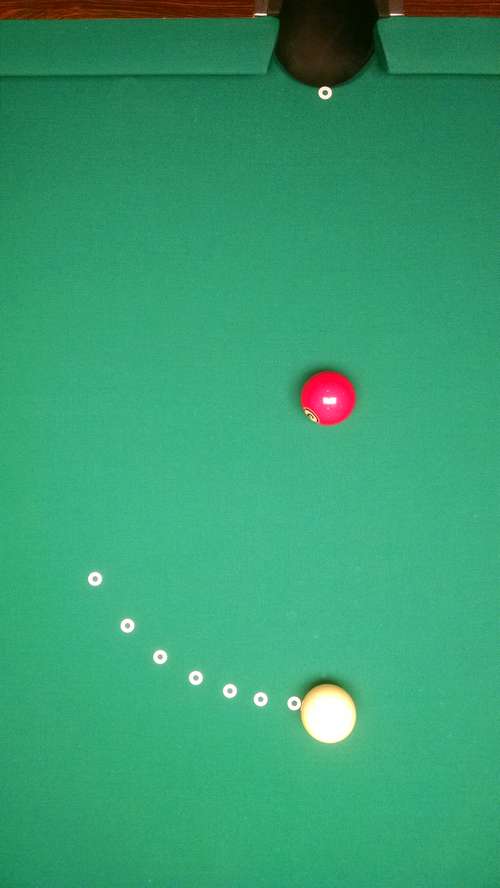
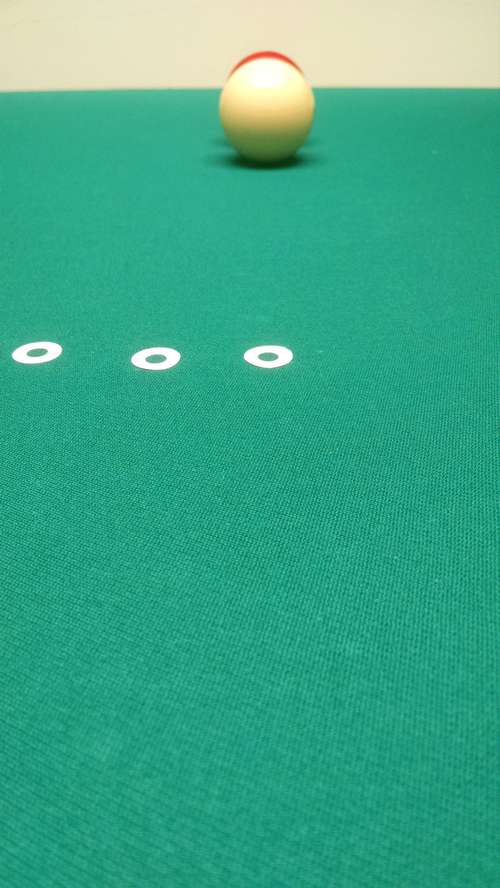
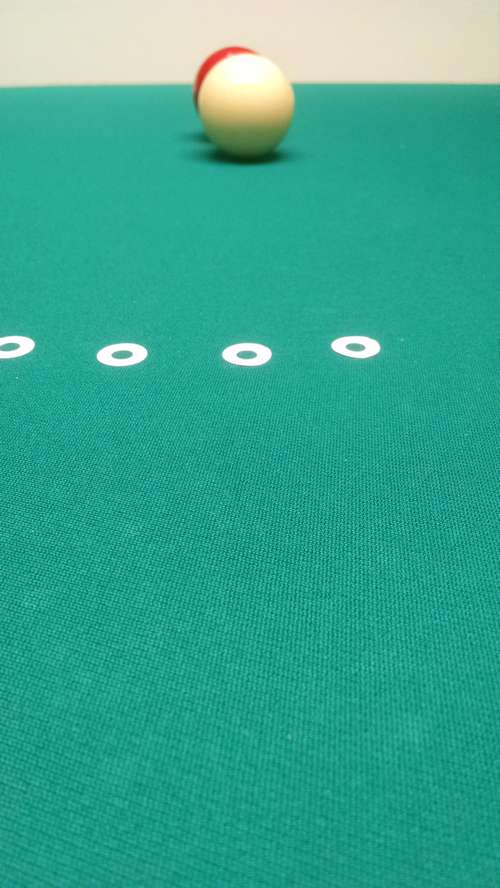
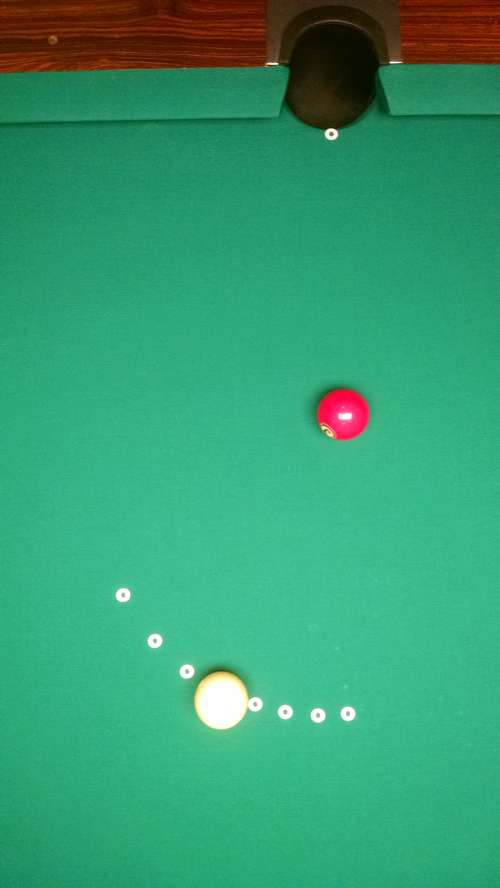
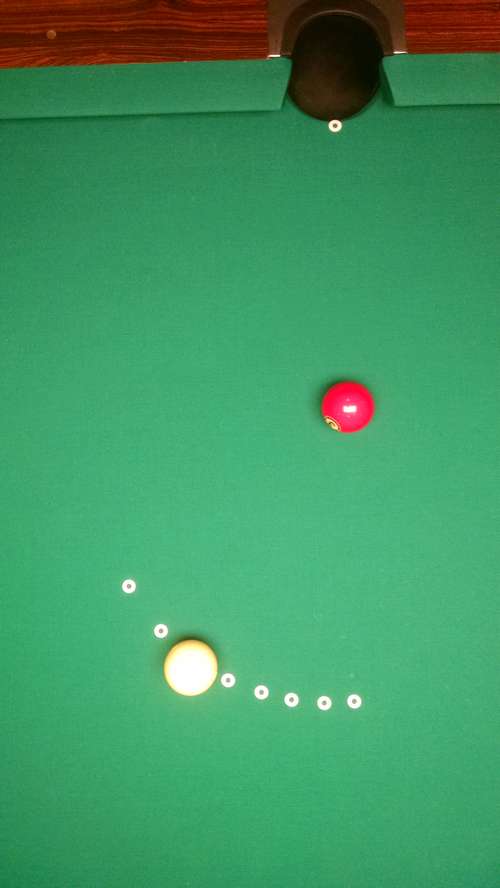
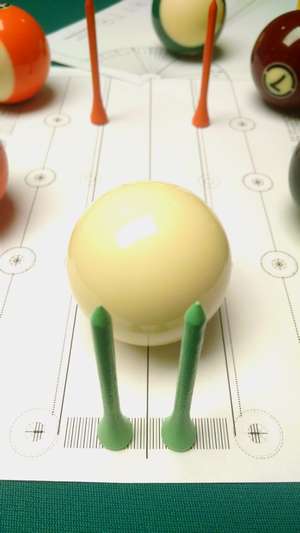
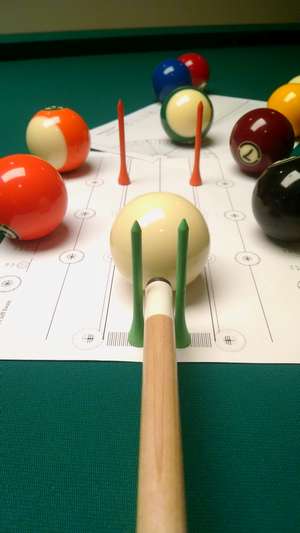
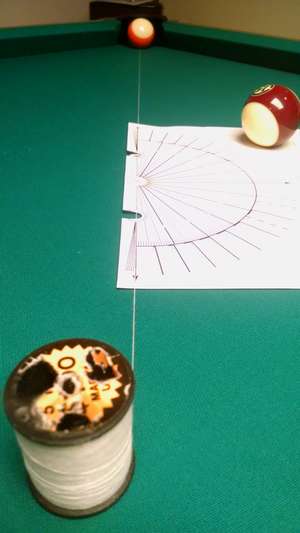
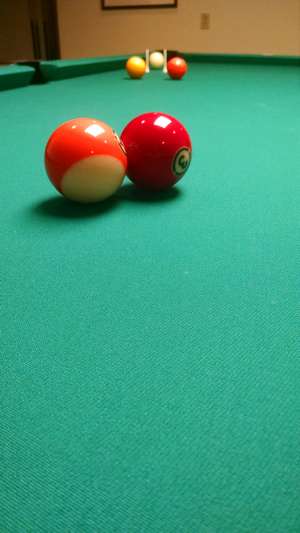
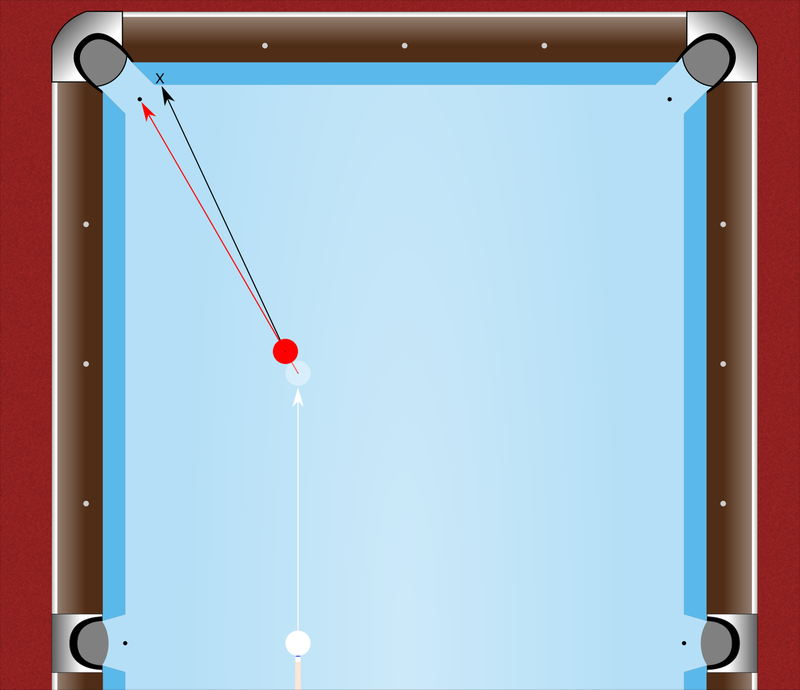
The ghost ball represents the position that the cue ball will occupy at the moment of collision with the object ball. It is often depicted as a faint “ghost” of a cue ball as in the picture below. As explained above, drawing a line at the moment of collision through the center of the cue ball in this position and the object ball’s center reveals the theoretical post-collision path line of the object ball.

If the shooter can shoot the cue ball perfectly into a ghost ball position that creates a theoretical release line that points directly to the center of a pocket, the object ball should be pocketed. In a frictionless world, that is. The following section on “throw” will explain why this is not always the case.

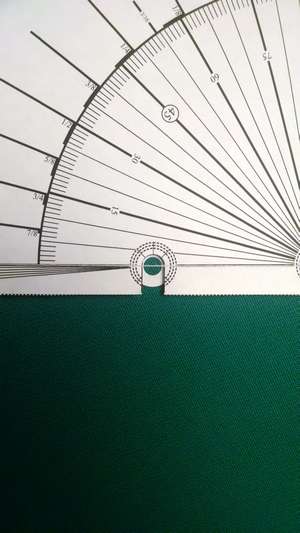
Throtractor, RotoThrotractor, The Gauntlet and RotoThroBro contain icons that are precisely placed in the ghost ball’s resting position which is exactly one ball diameter away from the object ball’s resting position.
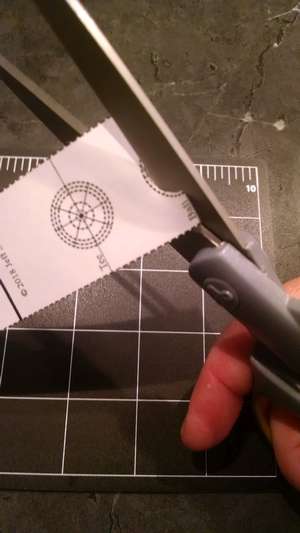
Throtractor Cue Ball and Object Ball Touching Showing Accurate Billiard Tools Design
RotoThrotractor Cue Ball and Object Ball Touching Showing Precision Training Tool Design

What is Throw?

Look around. We live in a world full of friction, so why should it be any different for billiard balls? I mention the theoretical release line throughout these instructions. It is a great reference line, because it represents the path along which the object ball would theoretically travel if the collision between the cue ball and object ball were friction-free and perfectly elastic.

But no matter how much we may polish our balls, they will always stick to one another (at least a little bit) before separating after collision. Because of this, the cue ball will “throw” the object ball off of its theoretical release line. To what degree it does this depends on factors such as the speed and spin on the cue ball, the particular equipment being used, the condition of that equipment, and perhaps even environmental conditions.

Fortunately, using the practice tools will give you the feedback necessary to learn when to expect throw, how much throw to expect, and how to adjust for it.

Example: The shot below is a 30° shot on the red ball to the corner pocket. In a friction-free world, this would be a 1/2-ball shot and the red ball would travel along the red line crossing the black dot marking the center of the pocket. But if the maximum amount of throw (5° in the case of a 1/2-ball shot) were to effect the shot, the red ball would miss the pocket and strike the cushion at X. 

Essentially, throw has turned the 1/2-ball theoretical shot of 30° into a 1/2-ball shot as low as 25° in this case.

Billiard Ball Throw Effect Medium Distance to Pocket

If we were to move the same 30° shot much further away from the pocket, the same 5° of maximum throw would result in the red ball missing the pocket by a much larger margin, striking the cushion at Y.

Billiard Ball Throw Effect Distant from Pocket

So it is important to recognize that throw can have a significant effect. Understanding it and knowing how to adjust for it could mean the difference between potting a ball or missing it wildly. Throw doesn’t have to be your enemy. Get to know it better by using the training tools, and make friends with throw!

Here is a video of an experiment I conducted to determine the throw ranges that are incorporated into the training tools.

Play Video

Overview of the Training Tools

Back to the tools. What exactly do they do? I’ll begin with short descriptions of each.

Throtractor:  a tool for precision marking of repeatable practice shot setups. It measures angles, incorporates ball fractions, and compensates for the effects of throw.

RotoThrotractor:  an adjustable protractor that measures angles, incorporates ball fractions, and compensates for the effects of throw. Pool, snooker, or billiard balls are to be placed and played directly upon this tool. It is designed to be connected to either The Gauntlet or RotoThroBro.

The Gauntlet:  designed to sharpen stroke, sighting, and aiming by offering visual guides as well as optional obstacles placed along the edges of the cue ball and cue shaft paths. Connect it to RotoThrotractor for precise shot angle practice. Pool, snooker, or billiard balls are placed and played directly upon this tool.

RotoThroBro:  essentially The Gauntlet without the visual guides or obstacles. Connect it to RotoThrotractor for precise shot angle practice. Pool, snooker, or billiard balls are placed and played directly upon this tool.

PortaGuards:  optional tools for use with Throtractor that are designed for precision marking of obstacles placed along the edges of the cue ball’s path.

Frangle Rock:  an aiming reference. The most common aims, angles and ball fractions are displayed on Throtractor, RotoThrotractor, The Gauntlet, and RotoThroBro. But Frangle Rock is more complete with an additional 32 reference shots. The large circle represents the object ball. The object ball equator’s 42 curves show where the left or right edge of the cue ball should be aimed for each corresponding shot angle and ball fraction.
Use Frangle Rock as both a visual and data reference when setting up practice shots with Throtractor or RotoThrotractor. Note that the angles listed are the theoretical “throwless” angles for each ball fraction.

Tool Accessories


Scissors or a Hobby Knife
: necessary for cutting along lines and curves to prepare tools for use.
Note: Try to cut through the center of all lines, not along their edges.


Though not absolutely essential, the following are a few accessories I strongly recommend for use with the training tools.


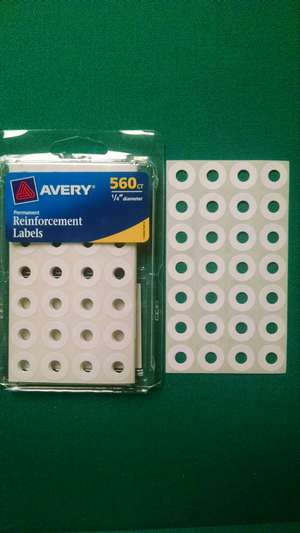
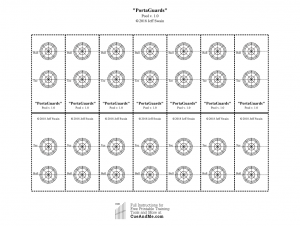
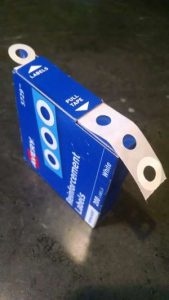
Self-Adhesive Hole Reinforcement Labels (white):
Such as the Avery #6734 pictured above. The training tools were designed to make good use of these labels. You’ll see the icon below repeated often throughout the tools. I call it the Label Placement Object (LPO), and it is designed to receive hole reinforcement labels for precise and repeatable ball placement.
 Label Placement Object

Try to use labels that are manufactured with nicely-centered holes like the Avery #6734. Some label products have holes very off-center, especially those that come in dispenser packs like the Avery #5729 shown below.

Wonky Labels

But don’t worry too much if your labels have off-center holes. The only tool that requires perfectly-centered holes is PortaGuards. The rest of the tools will work fine as long as you carefully center the label holes around the LPO centers when preparing the tools for use.


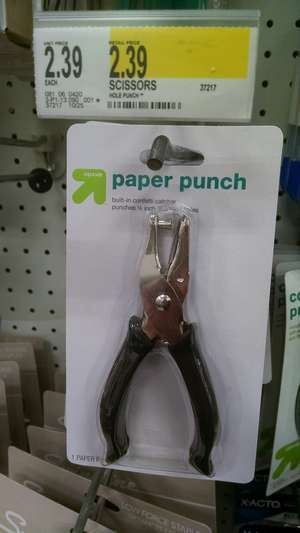
Hole Puncher:
For optional use when preparing Throtractor.


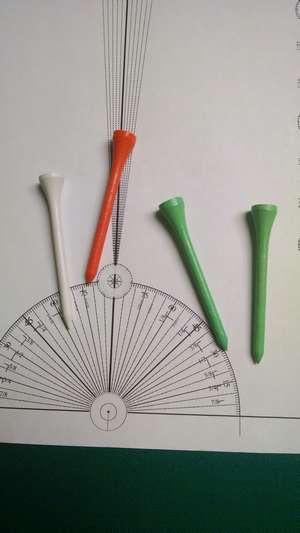
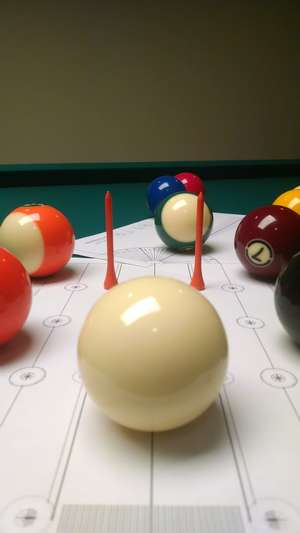
Standard Wood or Plastic Golf Tees:
To guard the edges of the cue ball path, The Gauntlet and PortaGuards offer placement of upside-down golf tees. Some tees in a lot can be a bit crooked. Choose the straightest tees by placing several tees side-by-side standing on their heads on a flat surface. They should point straight up and remain pointing straight up when rotated on the surface.
You can round off the point on the tee with a file or sandpaper if you’re concerned that it might damage table felt.


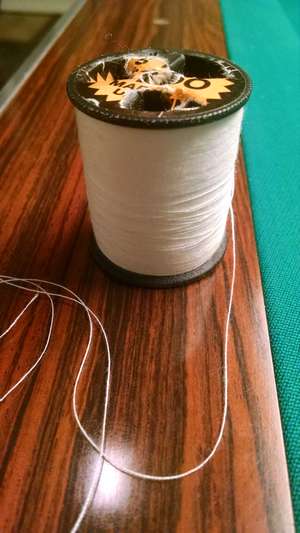
Sewing Thread (preferably on its spool):
The best accessory for precise marking of cue ball position or PortaGuards when using Throtractor.

Now that you’ve downloaded and printed the tools, click the button below to learn how to prepare and use them at the table.