Cue Ball Post-Collision Angles

Until now, we have focused solely on the shot angle of the object ball—the angle that sends it predictably along the release line after it collides with the cue ball. But the post-collision angle of the cue ball can also be fairly well predicted. This angle is more heavily affected by spin than the object ball, so it is important to understand the effects of various spins.

Dr. Dave Alciatore covered this in detail in his YouTube video on cue ball control, so I feel that I should focus on simply translating it all into Angle Detective terms.

Forward Cue Ball Labels

If at the moment of collision with the object ball the cue ball is spinning forward, the cue ball’s post-collision path will be forward of the tangent line.


Cue ball topspin can be applied by striking it above its equator, but it can also be applied by the cloth. If the cue ball is struck at or below its equator, it begins its journey with stun or draw (screw) spin, but the friction between cue ball and cloth eventually forces a transition to a forward spin. If this transition happens before the cue ball reaches the object ball, the cue ball’s post-collision path will be forward of the tangent line.

As Dr. Dave points out, the most extreme forward post-collision path is created when the cue ball is struck with topspin but softly enough so that it does not slide too far along the tangent line before gripping the cloth to roll forward.

For every shot angle or shot label there is a corresponding extreme post-collision forward cue ball angle. Knowing these extremes can help us with our cue ball position play. I decided to conduct an experiment to discover these forward angles. Using my free printable training tools “RotoThrotractor” and “The Gauntlet” https://cueandme.com/billiard-training-tools/ I was able to precisely test 18 fractional aims and their corresponding post-collision cue ball angles.

The video of the experiment will soon be on my YouTube channel:

Severely restricted by the golf tee cue ball guards on The Gauntlet, I shot each aim until I had filmed at least three clean shots. The chart below shows the results of the experiment. “Aim” is the fractional aim on the object ball. “OBt°” is the theoretical friction-free object ball angle in degrees for that fractional aim. “OB°” is the Angle Detective object ball angle for each fractional aim. “CB°” is the cue ball’s average or most common forward angle of the three clean shots for each fractional aim. “Shot Label” is the Angle Detective shot label that corresponds to the fractional aim. “CB Label” is the CB° forward angle translated into Angle Detective labeling language.

Aim

Full

15/16

7/8

13/16

3/4

11/16

5/8

9/16

1/2

7/16

*

3/8

5/16

1/4

3/16

5/32

1/8

1/16

1/32

1/128

1/∞

OBt°

0

3.6

7.2

10.8

14.5

18.2

22

25.9

30

34.2

37

38.7

43.4

48.6

54.3

57.5

61

69.6

75.6

83

90

OB°

0

3.6

7.1

10.6

14

17.4

20.6

23.6

26.6

32

35

36.9

41.2

45

53.1

55.5

58

69.4

76

82.9

90

CB°

0

5

13

23

30

34

35

36.5

37

36

35

34

33

29

26.5

23

21

13

10

5

0

Shot Label

A

AB

B

BC

C

CD

D

DE

E

EF

F-

F

FQ

Q

R

R+

RS

ST

T

TU

U

CB Label

A

B-

C

DE

E+

F-

F-

F

F

F

F-

F-

EF

E+

E

DE

D

C

BC

B-

A

Aim

Full

15/16

7/8

13/16

3/4

11/16

5/8

9/16

1/2

7/16

*

3/8

5/16

1/4

3/16

5/32

1/8

1/16

1/32

1/128

1/∞

OBt°

0

3.6

7.2

10.8

14.5

18.2

22

25.9

30

34.2

37

38.7

43.4

48.6

54.3

57.5

61

69.6

75.6

83

90

OB°

0

3.6

7.1

10.6

14

17.4

20.6

23.6

26.6

32

35

36.9

41.2

45

53.1

55.5

58

69.4

76

82.9

90

CB°

0

5

13

23

30

34

35

36.5

37

36

35

34

33

29

26.5

23

21

13

10

5

0

Shot

A

AB

B

BC

C

CD

D

DE

E

EF

F-

F

FQ

Q

R

R+

RS

ST

T

TU

U

CB

A

B-

C

DE

E+

F-

F-

F

F

F

F-

F-

EF

E+

E

DE

D

C

BC

B-

A

The cue ball forward rectangle is drawn from Position 2. It essentially shares its near side with the Position 2 object ball rectangle, although its near/top corner is actually the center of the ghost ball rather than the object ball aim. Although the object ball’s rectangle is sized according to the location of the pocket center, the cue ball’s rectangle contains only proportion and therefore can be sized however we wish. We can size it until its far/bottom corner meets a mirrored image of the pocket or until it meets a cushion or ball or anything else.

After shooting all of the fractional aims, I decided to go back to the angles between 34° and 38° to find the one shot angle with the unique characteristic of having a forward cue ball angle that is exactly the same size. I discovered that the theoretical aiming angle of 37° results in an actual object ball angle of 35° and a cue ball forward angle that is also 35°. This shot label is ‘F-’. So when shooting a topspin ‘F-’ shot, we can expect the cue ball to deflect at a forward cue ball shot label of ‘F-’ as well.

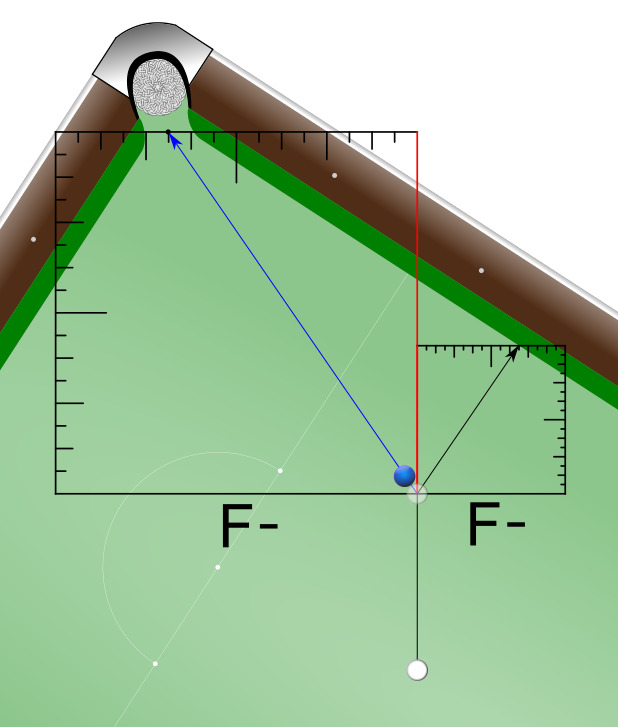
Another interesting characteristic of the ‘F-’ shot is that the cue ball and object ball also travel at about the same speed after collision. This also means that relative to the object ball, the cue ball travels at a slower speed for all forward shots from ‘A’ through ‘EF’ and at a faster speed for all forward shots from ‘F’ through ‘U’. Keeping this in mind, we can better predict the cue ball’s travel distance and more precisely gauge the necessary stroke power for better position play.

Stun Cue Ball Labels

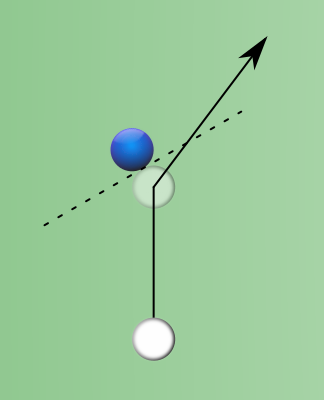
When the cue ball has neither forward nor backward spin on it at the moment of collision it responds by traveling along the tangent line.


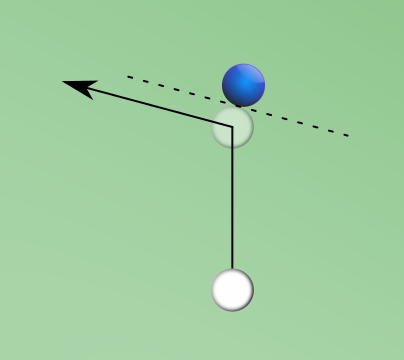
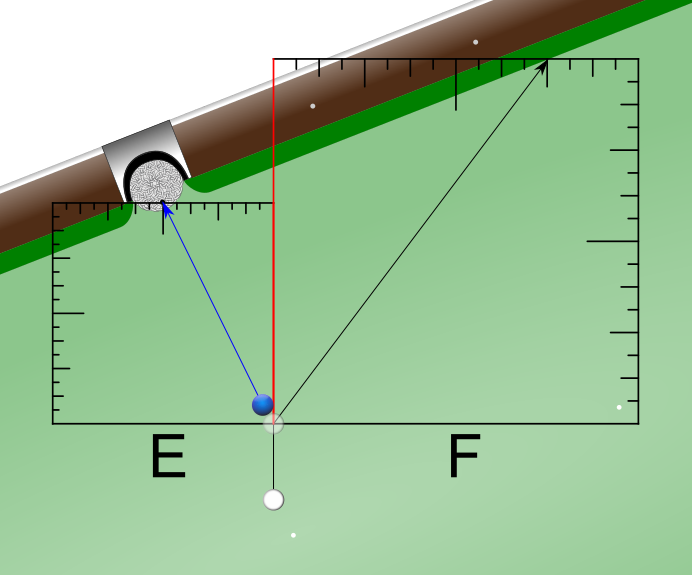
The cue ball’s post-collision angle in this case would be fairly easily calculated as 90° minus the object ball’s angle. And of course we can translate the result into an Angle Detective rectangle and shot label. The object ball and cue ball labels for a stun shot happen to be the same labels that mirror one another on the Master Square’s bottom and far sides.

Aim

Full

15/16

7/8

13/16

3/4

11/16

5/8

9/16

1/2

7/16

3/8

5/16

1/4

7/32

3/16

5/32

1/8

3/32

1/16

1/32

1/128

1/∞

OBt°

0

3.6

7

11

15

18

22

26

30

34

39

43

49

51

54

58

61

65

70

76

83

90

OB°

0

3.6

7

11

14

17

21

24

27

32

37

41

45

49

53

56

58

63

69

76

83

90

CB°

90

86.4

83

79

76

73

69

66

63

58

53

49

45

41

37

34

32

27

21

14

7

0

Shot Label

A

AB

B

BC

C

CD

D

DE

E

EF

F

FQ

Q

QR

R

R+

RS

S

ST

T

TU

U

CB Label

U

U-

TU

T+

T

T-

ST

S+

S

RS

R

QR

Q

FQ

F

F-

EF

E

D

C

B

A

Aim

Full

15/16

7/8

13/16

3/4

11/16

5/8

9/16

1/2

7/16

3/8

5/16

1/4

7/32

3/16

5/32

1/8

3/32

1/16

1/32

1/128

1/∞

OBt°

0

3.6

7

11

15

18

22

26

30

34

39

43

49

51

54

58

61

65

70

76

83

90

OB°

0

3.6

7

11

14

17

21

24

27

32

37

41

45

49

53

56

58

63

69

76

83

90

CB°

90

86.4

83

79

76

73

69

66

63

58

53

49

45

41

37

34

32

27

21

14

7

0

Shot

A

AB

B

BC

C

CD

D

DE

E

EF

F

FQ

Q

QR

R

R+

RS

S

ST

T

TU

U

CB

U

U-

TU

T+

T

T-

ST

S+

S

RS

R

QR

Q

FQ

F

F-

EF

E

D

C

B

A

We see that for a stun shot, the 1/4-ball aim is the one that sends the cue ball and object ball off at the same angle. Post-collision, not only do they deflect at opposite 45° angles but also travel at about the same speed.

Draw/Screw Cue Ball Labels

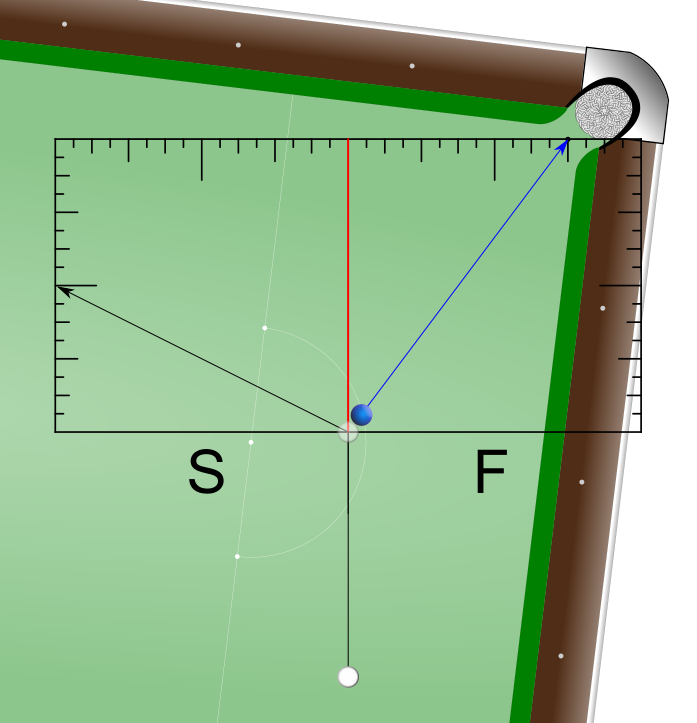
When the cue ball has backspin on it at the moment it collides with the object ball it responds by traveling backwards from the tangent line.


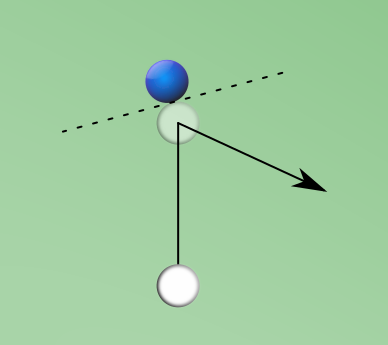
Multiplying according to Dr. Dave’s “3 Times the Angle” method, we discover that we need to split shots into two groups—angles up to 30° (‘A’ through ‘E’) and angles over 30° (‘E+’ through ‘FQ’). Since backspin offers little backward effect from the stun tangent line for shots above ‘FQ’, we can ignore them here and simply use the stun labels for those shots.

‘A’ through ‘E’

Standing in Position 2, the cue ball’s rectangle for the first group is oriented as though it were a Position 1 rectangle, but its top/near corner is at the ghost ball and its near side lies along the cue ball’s pre-collision travel path to the object ball.
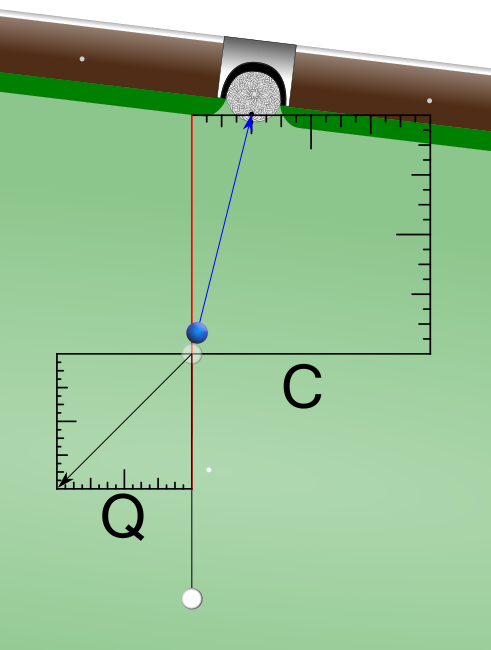
Aim

Full

15/16

7/8

13/16

3/4

11/16

5/8

9/16

1/2

OBt°

0

3.6

7

11

15

18

22

26

30

OB°

0

3.6

7

11

14

17

21

24

27

CB°

0

11

21

33

45

54

66

78

90

Shot Label

A

AB

B

BC

C

CD

D

DE

E

CB Label

A

BC

D

EF

Q

R

S+

T+

U

Aim

Full

15/16

7/8

13/16

3/4

11/16

5/8

9/16

1/2

OBt°

0

3.6

7

11

15

18

22

26

30

OB°

0

3.6

7

11

14

17

21

24

27

CB°

0

11

21

33

45

54

66

78

90

Shot

A

AB

B

BC

C

CD

D

DE

E

CB

A

BC

D

EF

Q

R

S+

T+

U

‘E+’ through ‘U’

Standing in Position 2, the cue ball’s rectangle for the second group is the same rectangle orientation as the forward or stun rectangle.

Aim

7/16

3/8

5/16

OBt°

34

39

43

OB°

32

37

41

CB°

78

63

51

Shot Label

EF

F

FQ

CB Label

T+

S

R-

Aim

7/16

3/8

5/16

OBt°

34

39

43

OB°

32

37

41

CB°

78

63

51

Shot

EF

F

FQ

CB

T+

S

R-

Object Ball as a Brake

Before moving on to the Training section, I want to offer an alternative perspective of the object ball. Rather than viewing the object ball solely as an object we send to a pocket, we can also view it as a brake for the cue ball. The cue ball travels at full speed until it is forced to slow down after colliding with the object ball, and the object ball’s braking force decreases as the shot angle increases.

So the cue ball retains virtually all of its speed after, say, an ultra-thin 89° shot collision, because almost none of the cue ball’s force is being transferred to the object ball. But the cue ball is forced to a complete stop after a full ball 0° stun shot collision, because almost all of its force is being transferred to the object ball. And about half of the cue ball’s force is transferred to the object ball during a 45° stun shot collision.

I don’t really have any instruction for this. I bring it up simply to recommend that we begin paying attention to and perhaps even listening to collisions as we practice and play so that we can develop a sense for the object ball’s inertia and its resistance to the cue ball’s momentum at various shot angles.